This Cannoli Cake is rich, creamy, and layered with classic Italian cannoli flavors. An easy dessert that’s perfect for celebrations, holidays, or whenever you want a show-stopping sweet treat.
This Cannoli Cake is a rich, creamy dessert inspired by the classic Italian pastry, but in an easy, layered cake form. Every bite is filled with smooth, sweet filling and soft cake that comes together into something truly irresistible.
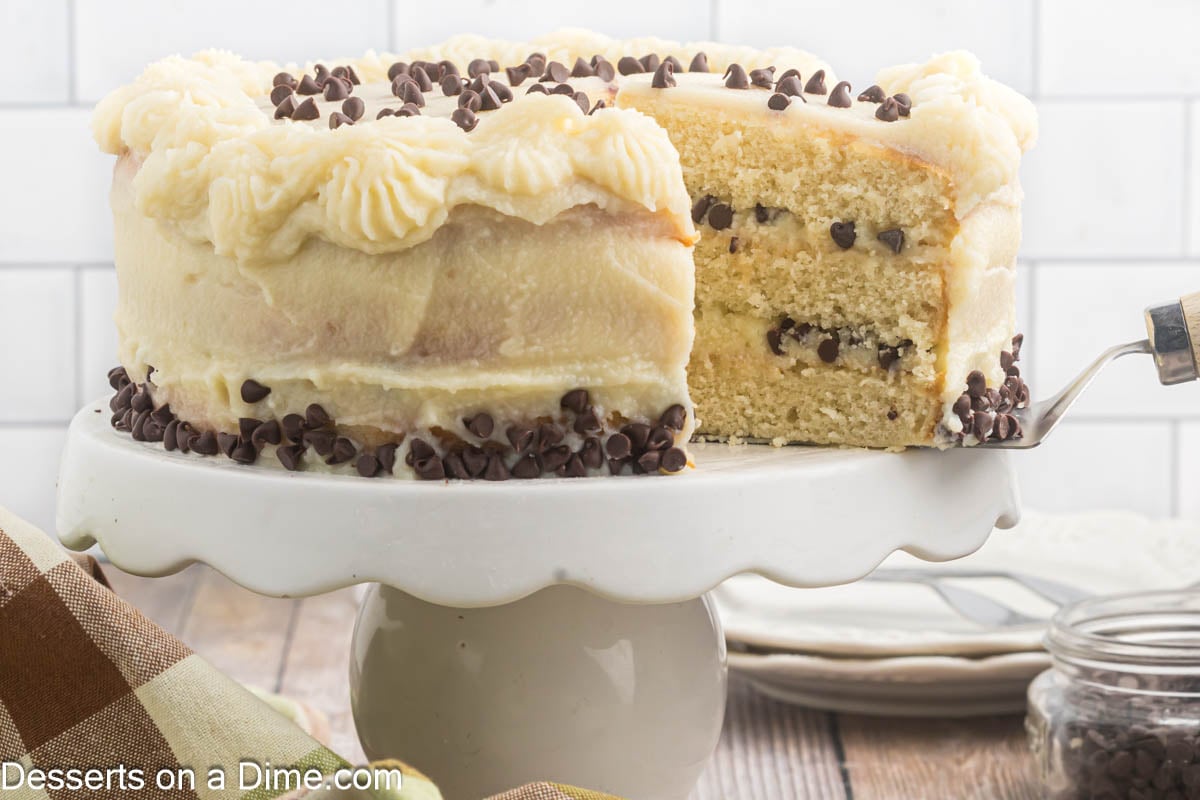
One of my favorite Italian Christmas Desserts is this decadent Cannoli Cake. It is so easy and delicious that I make it all year long. The frosting tastes just like homemade cannoli filling and it’s absolutely amazing.
I have been making this for years and we love it. Everyone also loves Cannoli Poke Cake, Cannoli Pie Recipe and Cannoli Dip Recipe.
For something bite size, try Carrot Cake Truffles.
Table of contents
Why We Love This Recipe
- All the cannoli flavor: Captures the classic taste in an easy cake form.
- Creamy, rich filling: Smooth and indulgent in every bite.
- Easy to assemble: Simple layers without complicated steps.
- Perfect for special occasions: A dessert that looks impressive and festive.
- Make-ahead friendly: Chills well and tastes even better the next day.
- Crowd favorite: Always gets compliments at parties and gatherings.
Ingredients

Cake
- All-purpose flour: Spoon into the measuring cup instead of scooping to keep the texture light and avoid packing in too much flour.
- Baking soda: A key leavening ingredient that helps the cake rise; make sure it’s fresh for the best results and don’t worry if you need to replace it.
- Unsalted butter: Used so you can control the salt level in the recipe, giving a more balanced and consistent flavor.
- Large eggs: Bring to room temperature before using so they blend smoothly into the batter and help create a better texture.
- Vanilla extract: Use a good-quality pure vanilla extract for a richer, deeper flavor that enhances the entire recipe.
Frosting
- Whole milk ricotta cheese: Gives the frosting its creamy texture and rich flavor—whole milk works best for the smoothest, most authentic result.
- Mascarpone cheese: Adds extra richness and silkiness; letting it soften first makes it easier to blend into a smooth frosting.
- Powdered sugar: Sweetens the frosting and helps create structure—sifting it first prevents lumps and keeps the texture light and fluffy.
- Mini chocolate chips: The small size distributes evenly throughout the frosting, giving little bursts of chocolate in every bite.
Find the complete list of ingredients at the bottom of the page.
Step By Step Instructions
- Step 1. Preheat the oven to 350 degrees Fahrenheit. Thoroughly grease and flour 3 8-inch circle cake pans.
- Step 2. Get out a large mixing bowl. Combine the flour, baking powder, baking soda and salt. Set aside the dry ingredients.

Step 3. Use a separate bowl and add the butter and sugar. Beat on medium speed for 3-4 minutes until fluffy. You can also use a stand mixer.

Step 4. Next, add the eggs and vanilla and mix together.

Step 5. Gradually add the flour and buttermilk. Start with about half of the flour mixture and mix until combined. Then add in half of the buttermilk and mix.

Step 6. Next, add the remaining flour and buttermilk until mixed together. Pour the cake batter into the prepared cake pans. Bake for 28-35 minutes until a toothpick inserted into the center of the cake comes out clean. Let the cakes cool in the pans for 10 minutes and then move to a wire rack.
- Step 7. Remove the moisture from the ricotta cheese. Place in between 2 paper towels or cheesecloths. Press firmly on the ricotta cheese to get as much liquid out of the cheese as you can.
- Step 8. Next, put the ricotta cheese in a mixing bowl and fold in the mascarpone cheese, powdered sugar and vanilla extract. Mix until smooth.

Step 9. Carefully cut the round portion off of the top of the cakes using a serrated knife. This will make the cakes level. Put 1 of the cakes on a serving platter or cake stand.

Step 10. Then top the cake with the frosting and mini chocolate chips.

Step 11. Continue this process with the next 2 cakes. Frost the top and the sides of the cake with frosting. Sprinkle the remaining chocolate chips on top.

Step 12. Finally, slice and enjoy this wonderful cake.

Storage
Refrigerate: Store cannoli cake in an airtight container in the refrigerator for up to 3–4 days.
Keep chilled: This cake is best served cold to maintain the creamy frosting and structure.
Cover well: Use plastic wrap or a lid to prevent it from drying out or absorbing fridge odors.
Before serving: Let sit at room temperature for 10–15 minutes for the best texture and flavor.
Freezing (optional): Freeze tightly wrapped slices for up to 1 month; thaw in the refrigerator before serving.
Pro Tips
- Do a crumb coat: Because the frosting is soft, start with a thin crumb coat layer before fully frosting the sides and top of the cake. This helps lock in crumbs and creates a smoother final finish.
- Do not freeze: Freezing is not recommended, as the ricotta can become grainy and change the texture of the frosting.
- Cool cake completely: Make sure the cake is fully cooled before frosting, or the frosting may melt and slide off.
- Don’t overmix the filling: Mix just until combined—overmixing can make the mascarpone become watery and affect the light texture.
- Adjust thickness if needed: If you prefer a thicker frosting, gradually add more powdered sugar until you reach your desired consistency.
- Chill before serving: Let the frosted cake chill so the frosting can set and slice more cleanly.
- Use a gentle hand: When spreading frosting, use soft, even strokes to keep the airy texture intact.
More Layer Cake Recipes
Make this Cannoli Cake for your next celebration and enjoy every creamy, sweet bite of this Italian-inspired dessert! It’s rich, impressive, and sure to be a showstopper. Don’t forget to leave a review and star rating to share how it turned out!

Cannoli Cake
Ingredients
For the Cake:
- 2½ cups all-purpose flour
- 1 teaspoon baking powder
- 1/2 teaspoon Baking Soda
- ½ teaspoon salt
- 1 ¾ cups granulated sugar
- ⅔ cup unsalted butter softened
- 2 large eggs room temp
- 1 Tablespoon vanilla extract
- 1 1/2 cups buttermilk room temp
For the Frosting:
- 16 ounces Whole Milk Ricotta Cheese
- 16 Ounces Mascarpone Cheese softened
- 4 cups Powdered Sugar
- 1 Tablespoon vanilla extract
- 1 cup mini chocolate chips divided
See how we calculate recipe costs.
Instructions
For the Cake:
- Preheat the oven to 350 degrees Fahrenheit. Thoroughly grease and flour 3 8 inch circle cake pans.
- In a bowl, whisk together the flour, baking powder, baking soda and salt. Set aside.
- Place the butter and sugar in a bowl of a stand up mixer. Beat on medium speed for 3-4 minutes until the mixture is light and fluffy.
- Add in the eggs and vanilla and mxi until combined.
- Add in approximately half of the flour mixture and mix until combined. Add in half of the buttermilk and mix.
- Repeat with the remaining flour and buttermilk until all in mixed together.
- Pour the batter evenly into the prepared pans.
- Bake for 28-35 minutes until a toothpick inserted into the center of the cake comes out clean.
- Allow the cake to cool in the pans for 10 minutes.
- Use a knife to carefully loosen the cakes from the pan and move them to a cooling rack to cool completely before topping with the frosting.
For the Frosting:
- Place the ricotta cheese in between 2 paper towels or cheesecloths and press firmly down on the ricotta cheese to get as much moisture out of the cheese as possible.
- Place the ricotta cheese in a mixing bowl. Add in the mascarpone cheese, powdered sugar and vanilla extract.
- Mix with an electric mixture until all the ingredients are combined and smooth.
To Assemble the cake:
- Cut the round portion off of the top of the cakes with a serrated knife to make the cakes level.
- Put 1 of the cakes on a serving platter or cake stand. Top the cake with the frosting and mini chocolate chips (approximately ¼ cup).
- Continue this process with the next 2 cakes.
- Frost the top of the cake and the sides of the cake with the remaining frosting.
- Sprinkle the remaining chocolate chips on top.
- Then the cake is ready to slice, serve and enjoy!

Cannoli Cake is easy with step-by-step instructions. So glad I made this and it’s really delicious.
I want to try this. My question- can you use any pans other than 3 round ones.? Ie a 9×13. I don’t have round ones. Thank you
I haven’t tested this recipe in a 9X13 pan yet but I do have a Cannoli Poke Cake Recipe that is made in a 9X13 pan that is delicious! I hope you try it out!