Ice Cream Cone Christmas Trees make a fun activity for kids. These sugar cone Christmas trees are tasty and so fun for holiday parties.

As a busy mom, I love how simple these Ice Cream Cone Christmas Trees are to make. The kids love to help and it’s a fun tradition.
We also make Christmas Tree Brownies, Christmas Ice Cream and Christmas Tree Rice Krispie treats with the kids.
What's in this post: Ice Cream Cone Christmas Trees
What are Ice Cream Cone Christmas Trees?
They are adorable treats made with ice cream cones. Each cone is topped in frosting and adorned with toppings to look like a tree.
Candy and coconut is used to decorate these trees. The coconut gives the trees the appearance of snow.
You can use any assortment of candy to decorate the trees. The candy will serve as ornaments. This is a great time to use leftover candy for this kids Christmas treat.
Smaller candy such as M&M’s, skittles, and Reese’s Pieces work great. You can also used crushed candy canes to decorate this fun Christmas dessert.
Ingredients:

- Sugar Ice Cream Cones (the pointy ones)
- Tub of White Frosting
- Green Gel Food Coloring
- Assorted Candies (for the ornaments)
- Shredded Coconut (for snow)
You can scroll to the bottom and find the complete ingredient list for this Christmas treat.
Variations:
- Powdered Sugar. Sprinkle a dusting of confectionary sugar instead of coconut for the appearance of snow.
- Store bought or Homemade Icing. Either option is fine for this recipe. You can use pastry bags or piping bags if you desire. However, you can easily spread frosting with a plastic knife if kids are doing this project.
- Twizzlers. Get creative and hang garland on your tree using candy rope.
- Gum Drops. Place these around the bottom of the tree for decoration or to look like presents.
- Star sprinkles. Top each tree with a yellow star sprinkle to complete the look.
How to make Ice Cream Cone Christmas Trees:
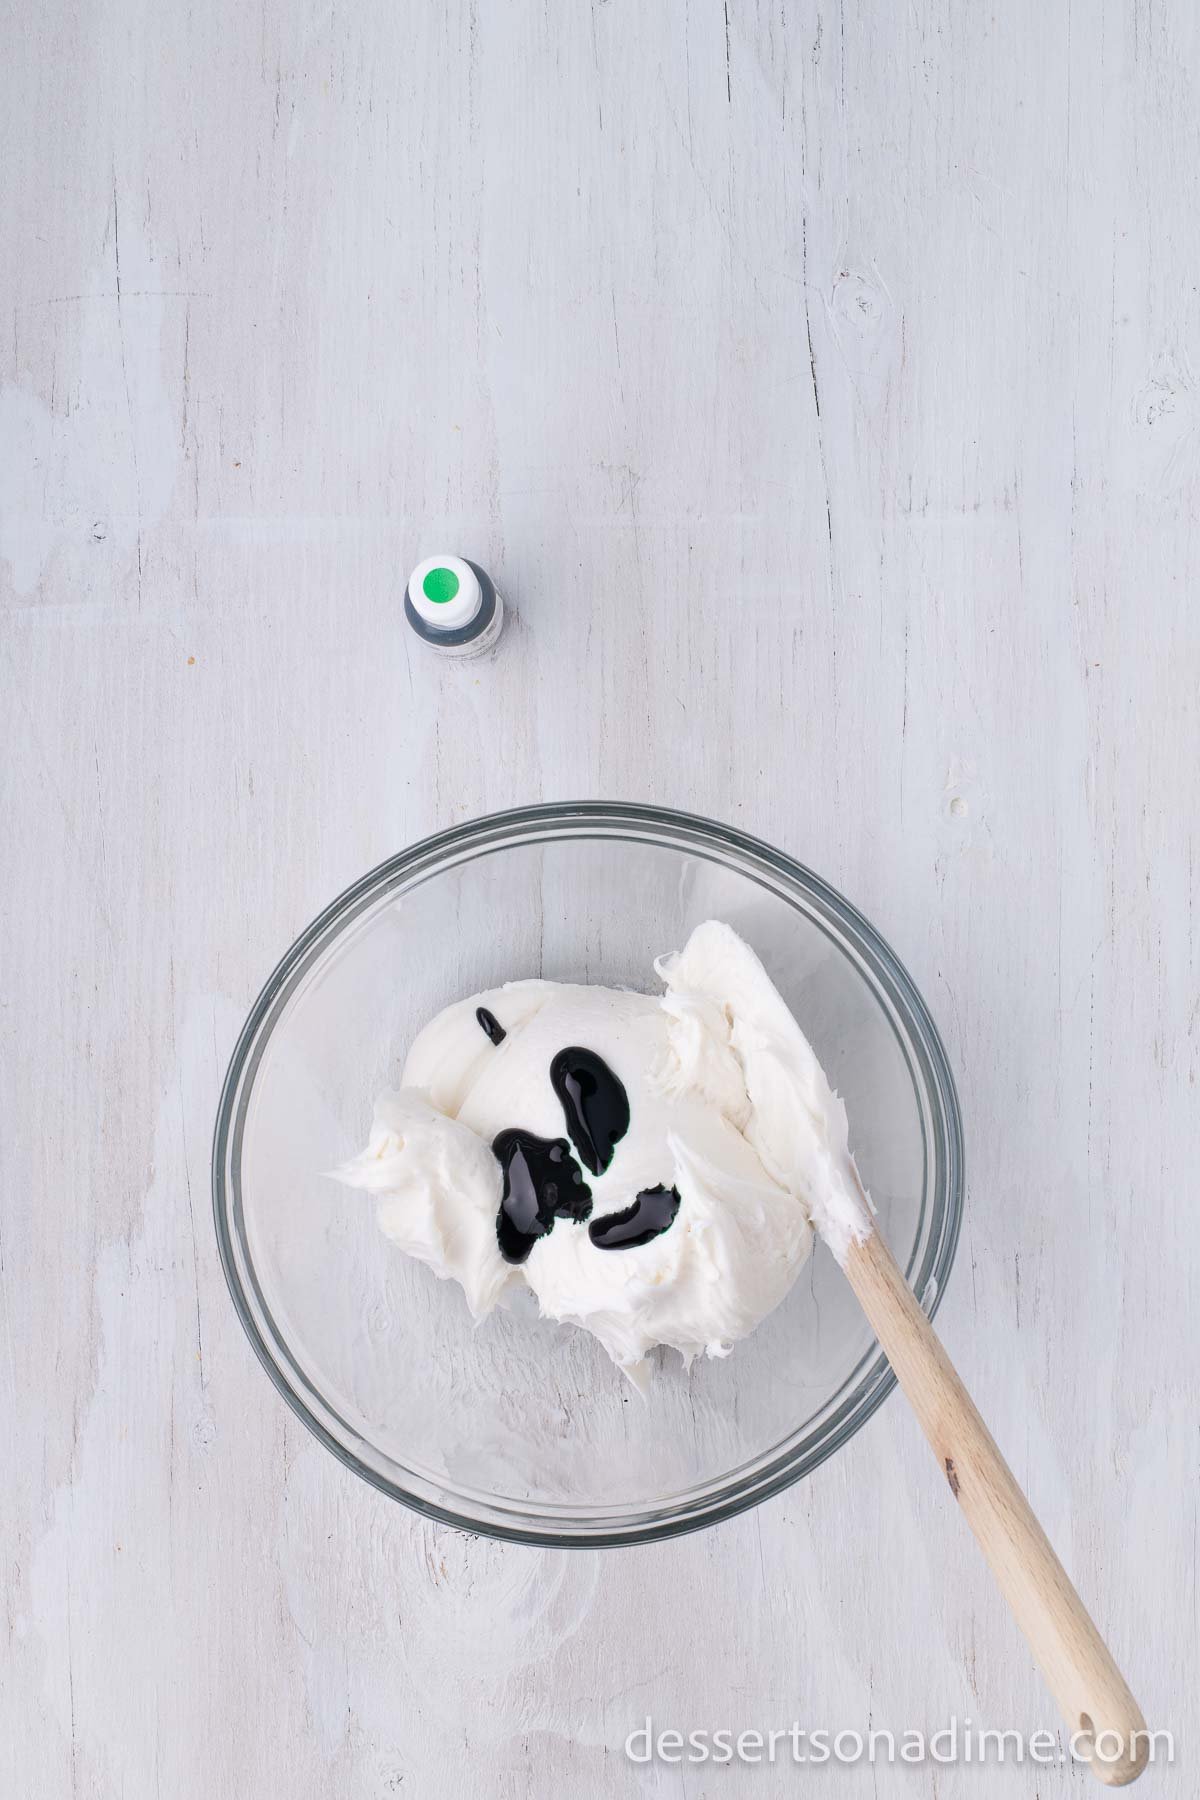
Step 1. Dye the white frosting green. Use the green food coloring until it is the desired shade of green.

Step 2. Place the ice cream cones upside down on wax paper.

Step 3. Spread the green frosting onto the outside of the ice cream cones with a butter knife or plastic knife if kids are doing this step.

Step 4. Continue to spread until the frosting is covering the cones.

Step 5. Then decorate the ice cream cones with the various candies of your choice to look like ornaments.

Step 6. You can also use shredded coconut to look like snow. They are ready to enjoy. You can use these as decoration or to eat.

Frequently Asked Questions
Yes, they are definitely edible. Kids will have a blast eating the sugar cones covered in icing and candy.
If covered and stored properly inside an airtight container, they will last up to 5 days.

Pro Tips:
- Decorate the trees before the icing sets so it will stick.
- Store inside an airtight container or wrap in foil if you plan to eat these.
- Don’t use very large pieces of candy. If they are too heavy, it will weigh down the cone and fall off.
- Cover the cone entirely so you only see icing. However, don’t use excessive frosting or it will slide off and make a mess as you add the candy.
More Christmas Desserts
- Christmas Tree Cake Pops
- Easy Christmas Rice Krispie Treats
- Homemade Christmas Brownies
- Christmas Light Cookies
- Grinch Puppy Chow
It’s your turn to make a fun Christmas tree ice cream cone. Please leave a comment once you do.

Ice Cream Cone Christmas Trees
Ingredients
- 8 Sugar Ice Cream Cones the pointy ones
- 16 oz. Tub of White Frosting
- Green Gel Food Coloring
- Assorted Candies for the ornaments
- Shredded Coconut for snow
See how we calculate recipe costs.
Instructions
- Dye the white frosting green with the green food coloring.
- Place the ice cream cones upside down on paper plates.
- Then spread the green frosting onto the outside of the ice cream cones with a butter knife or plastic knife if kids are doing this step.
- Then decorate the ice cream cones with the various candies or your choice to look like ornaments or with the shredded coconut to look like snow.
- Then the ice cream Christmas trees are ready to enjoy!
