Make a copycat Dairy Queen Buster Bar recipe with layers of vanilla ice cream, crunchy peanuts, rich hot fudge, and chocolate coating. An easy no-bake dessert everyone loves!
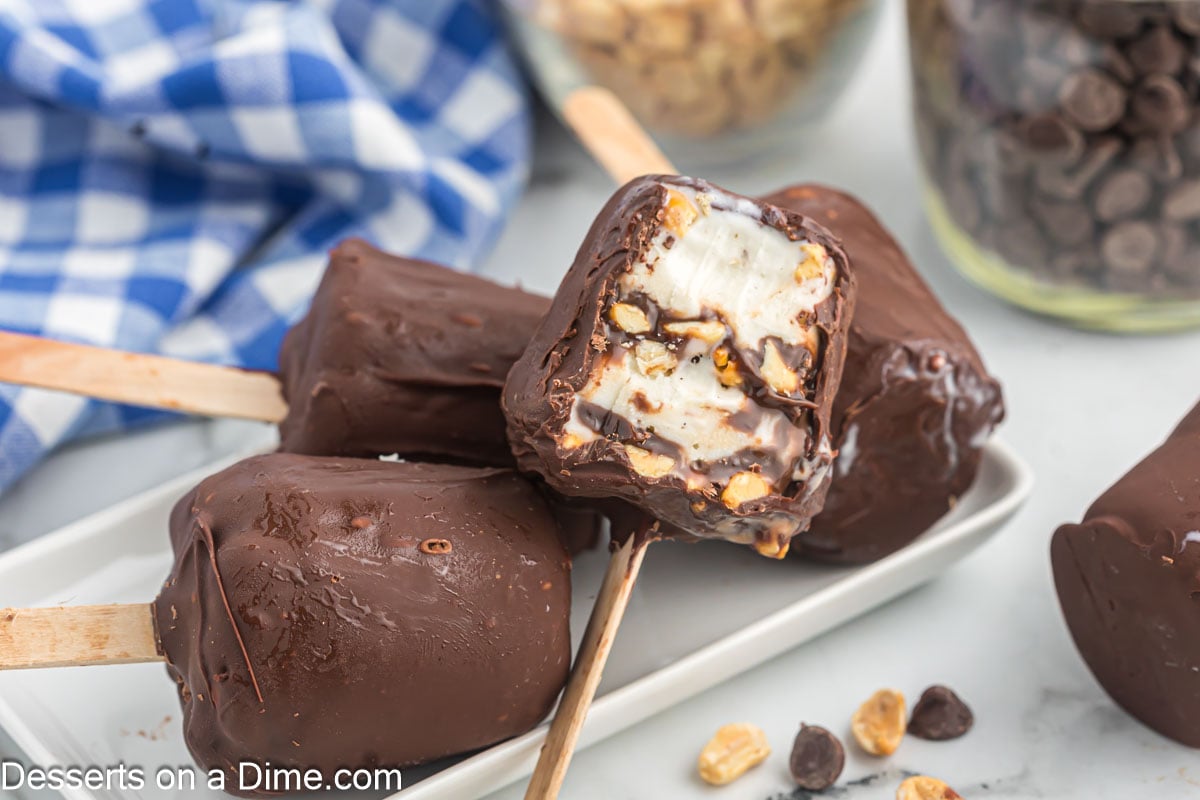
This copycat Dairy Queen Buster Bar recipe is a homemade version of the classic frozen dessert everyone loves. With layers of creamy vanilla ice cream, crunchy peanuts, rich chocolate coating, and a decadent fudge center, it’s an easy no-bake treat that tastes just like the original.
Perfect for summer, parties, or anytime you’re craving a nostalgic ice cream dessert at home. Everything is made in a plastic cup and it’s so easy to put together the yummy layers.
I love making special treats at home and also make Dairy Queen Ice Cream cake and Strawberry Yogurt Popsicles. We love copycat recipes and also make Cracker Barrel Fried Apples.
Table of contents
Why We Love This
- Classic Flavor Combination: Creamy vanilla ice cream, chocolate, and peanuts come together just like the original.
- No-Bake Dessert: Perfect for warm days when you don’t want to turn on the oven.
- Easy to Make Ahead: Assemble in advance and store in the freezer until ready to serve.
- Crowd-Pleasing Treat: A guaranteed hit for parties, cookouts, and family get-togethers.
- Customizable Layers: Easily adjust the peanut or fudge layers to suit your taste.
Supplies
- Small Plastic Cups (Dixie Cups): These are perfect for shaping individual buster bars. They make removing the frozen layers easy and help create uniform, handheld treats.
- Popsicle Sticks: Popsicle sticks are used as handles, making the buster bars easy to hold and serve straight from the freezer without any mess.
Ingredients

- Gallon Vanilla Bean Ice Cream: Creamy and rich ice cream with real vanilla bean specks for authentic flavor.
- Salted Peanuts: Adds crunch and a savory contrast to the sweet ice cream and chocolate.
- Hot Fudge Sauce: Thick, gooey chocolate sauce that creates the classic Buster Bar chocolate layer.
- Semi-Sweet Chocolate Chips: Used for coating or melting, providing a balanced chocolate flavor.
- Vegetable Oil: Helps thin the chocolate when making the coating and ensures a smooth finish.
Substitutions and Additions
- Nut Free. Omit the nuts and try other variations. You can substitute M&Ms, chocolate chips, crushed heath bars or any candy you like.
- Homemade fudge sauce. Instead of store bought, try The BEST Homemade Hot Fudge Sauce.
- Caramel Sauce. The addition of Easy Homemade Caramel Sauce Recipe is delicious in the layers.
- Peanut Butter. If you love peanut butter, try adding peanut butter in the layers.
- Magic Shell. Substitute Magic Shell for the hot fudge. I love this Magic Shell Recipe.
- Ice Cream. Chocolate fans might like to try chocolate ice cream instead of vanilla.
Step By Step Instructions

Step 1. First, add about a teaspoon of peanuts into the bottom of each cup.

Step 2. Next, place a layer of vanilla ice cream on top of the peanuts. Press it down firmly into each cup.

Step 3. Top the ice cream with about 1 tablespoon of hot fudge sauce. Make sure to spread it into an even layer.

Step 4. Continue with the ingredients again in the cups. Start by adding another layer of peanuts.

Step 5. Then add another layer of ice cream.

Step 6. Top with hot fudge. Pour the chocolate evenly.

Step 7. Then top each cup with more peanuts. Carefully place a popsicle stick into the center of each cup. Place the cups on a baking sheet lined with parchment paper and freeze for 2-3 hours until the ice cream cups harden.

Step 8. Melt the chocolate chips. Remove the ice cream cups from the freezer and lightly squeeze the outside of the cups to remove the ice cream from the cups. Then dip the frozen ice cream into the melted chocolate coating. Place back on the baking sheet and freeze until set.
Pro Tips
- Push each layer down: As you add each new layer, firmly press it into the previous layer to prevent air pockets.
- Easily remove the ice cream from cups: Dip the cups briefly in cool water or run a butter knife around the outside edge to release the ice cream.
- Don’t overfill the cups: Adding too many ingredients can make it difficult to fully coat the bars with chocolate.
- Freeze before coating: Make sure the bars are completely frozen before dipping into chocolate for a clean, smooth coating.
- Use room-temperature chocolate for coating: Slightly warmed chocolate will coat evenly without cracking.
- Work quickly: Once the bars are frozen, dip them one at a time to avoid melting or dripping.
- Double layer chocolate: For a thicker chocolate shell, dip each bar a second time after the first layer sets.
- Add toppings immediately: Sprinkle peanuts or other toppings while the chocolate is still wet so they stick properly.
- Store properly: Keep finished bars in an airtight container in the freezer to maintain texture and flavor.

Storage
Freezer Storage: Place the finished bars in an airtight container or wrap individually in plastic wrap or parchment paper. Store in the freezer for up to 2–3 weeks.
Avoid Moisture: Make sure the bars are completely frozen before stacking or covering to prevent the chocolate from sticking or sweating.
Serving Tip: Let bars sit at room temperature for 1–2 minutes before serving to slightly soften the ice cream for easier biting.
Frequently Asked Questions
Yes. Dilly Bars consist of ice cream on a stick covered with chocolate. Whereas Buster Bars have peanuts and hot fudge layered in between the ice cream.
This buster bar recipe is easy to make ahead of time. I like to make it a few days in advance and place in the freezer. The kids love having these at home for snacks.
Yes, but you probably want to add something in its place. Ideas include candy, coconut, Oreo cookies or other toppings you love.
More Frozen Treat Recipes To Try
- Nutter Butter Ice Cream
- Easy Fried Ice Cream Recipe
- Strawberry Shortcake Popsicles Recipe
- Chocolate Banana Popsicles Recipe
- Strawberry Crunch Bars Recipe
- Wendy’s Frosty Recipe
Make this dessert recipe today for the best treat. Leave a comment and star rating once you do. It is the best summer dessert.

Buster Bar
Equipment
- 6 Small Plastic Cups (Dixie cups)
- 6 Popsicle Sticks
Ingredients
- 1/2 Gallon Vanilla Bean Ice Cream
- 3/4 cup Salted Peanuts
- 1 Jar Hot Fudge Sauce approximately 12 ounces
- 12 ounces Semi-Sweet Chocolate Chips
- 1 Tablespoons Vegetable Oil
See how we calculate recipe costs.
Instructions
- Place approximately 1 teaspoon of peanuts into the bottom of each cup.
- Place a scoop of ice cream on top and press it down firmly into each cup.
- Then top the ice cream with approximately 1 tablespoon of hot fudge sauce, spreading it into an evenly layer.
- Continue with this ingredients again in the cups: peanuts, ice cream and hot fudge. Make sure to press down into the cup once each layer is added.
- Then top each cup with more peanuts and carefully place a popsicle stick into the center of each cup.
- Place the cups on a baking sheet lined with parchment paper and freeze for 2-3 hours until the ice cream cups are harden.
- Place the chocolate chips and vegetable oil in a microwave safe dish that is tall enough to dip the ice cream cups into.
- Microwave in 30 second intervals, stirring after each interval, until the chocolate chips are fully melted.
- Remove the ice cream cups from the freezer and lightly squeeze the outside of the cups to remove the ice cream from the cups. You can also dip the cups into cool water or run a butter knife around the outside edge of the cups to release the ice cream if needed.
- Then dip the frozen ice cream into the melted butter making sure that the outside if fully coated and gently twirl the ice cream to remove any excess chocolate that may drip off.
- Place back on the baking sheet lined with parchment paper. Continue this process until all the ice cream pops are coated with the chocolate.
- Place the baking sheet back into the freezer until the chocolate is set (approximately 30-60 minutes).
- Then the homemade buster bars are ready to serve and enjoy!
