Enjoy a creamy, layered Dairy Queen Ice Cream Cake at home! This easy copycat recipe recreates the classic ice cream cake with rich layers, chocolate, and whipped topping.
This Dairy Queen ice cream cake brings the classic dessert right into your kitchen. Layers of creamy ice cream, rich chocolate, and fluffy whipped topping combine to create a no-bake treat that’s perfect for birthdays, celebrations, or any time a sweet, indulgent dessert is needed. We love Dairy Queen and also make Dairy Queen Buster Bar Recipe during the summertime.
Simple to assemble and always crowd-pleasing, it delivers all the flavor of the original DQ cake without leaving home. This is often the type of cake the kids want for their birthday, special occasions and more. We even make Christmas Ice Cream Cake.
Also try any of our Best Ice Cream Desserts. The kids love when I make Rolled Ice Cream Recipe, Unicorn Ice Cream and Puppy Chow Ice Cream.
Table of contents
Why This Recipe Works
- No-bake convenience: Layers of ice cream, chocolate, and whipped topping come together without turning on the oven.
- Creamy, indulgent texture: Soft ice cream and fluffy whipped topping create a smooth, dreamy dessert.
- Customizable layers: Chocolate, cookie, or caramel additions let you adjust flavors to your liking.
- Perfect for celebrations: Easy to assemble, slice, and serve to a crowd.
- Crowd-pleasing flavor: Everyone loves the combination of chocolate, ice cream, and whipped cream in one indulgent cake.
Ingredients

- Oreo Crumbs. I prefer to use regular Oreo Cookies and not double stuffed chocolate sandwich cookies.
- Vanilla Ice Cream. Store bought or No Churn Vanilla Ice Cream tastes great.
- Chocolate Ice Cream. Try No Churn Chocolate Ice Cream.
- Semi-Sweet Chocolate Chips. You can also use milk chocolate or dark chocolate.
- Vanilla Extract. Pure vanilla extract is best to use.
Whipped Cream
- Heavy Whipping Cream. Make sure it is cold before using.
- Powdered sugar. Sift before using.
Find the entire recipe and ingredients at the bottom of the page.
Variations and Additions
- Use Different Sprinkles – Try different types of sprinkles for holidays or to match the birthday party theme.
- Substitute different ice creams. – Cookies and cream is amazing. It will be delicious with the layer of oreo cookies! We also like No Churn Strawberry Ice Cream. You can use any of your favorite ice cream flavors.
- Add a Cake – Add chocolate cake in between the cake layers.
- Try different flavors Oreo cookies – There are so many options these days- birthday cake, red velvet, peanut butter and more.
- Use same flavor – Use all chocolate ice cream for lots of chocolate flavor. This will be a hit with chocolate fans.
- Add different Toppings – Top with a jar of hot fudge or cool whip.
How To Make Ice Cream Cake
- Step 1. Prepare Oreo Layer – Crush the Oreos and set aside.
- Step 2. Line the pan. Next, line an 8×3 inch cake pan with plastic wrap that covers the bottom. It also needs to go above the sides of the cake pan. I used two pieces.

Step 3. Soften the Ice Cream. Remove from the freezer and allow to soften for 20 minutes. Then add it to the prepared pan. Spread an even ice cream layer and freeze for 30 minutes.

Step 4. Make Hot Fudge Sauce. Combine the fudge layer by adding the chocolate chips, corn syrup and vanilla extract to a medium sized bowl.

Step 5. Heat the heavy whipping cream. Once it just begins to boil, pour over the chocolate chips. Then allow it to sit for a few minutes and then whisk until smooth.

Step 6. Pour Melted Fudge over Chocolate Ice Cream. Go ahead and remove the springform pan with the chocolate ice cream from the freezer. Pour the chocolate fudge over the ice cream. Spread as evenly as possible. Then freeze for about 10 minutes.

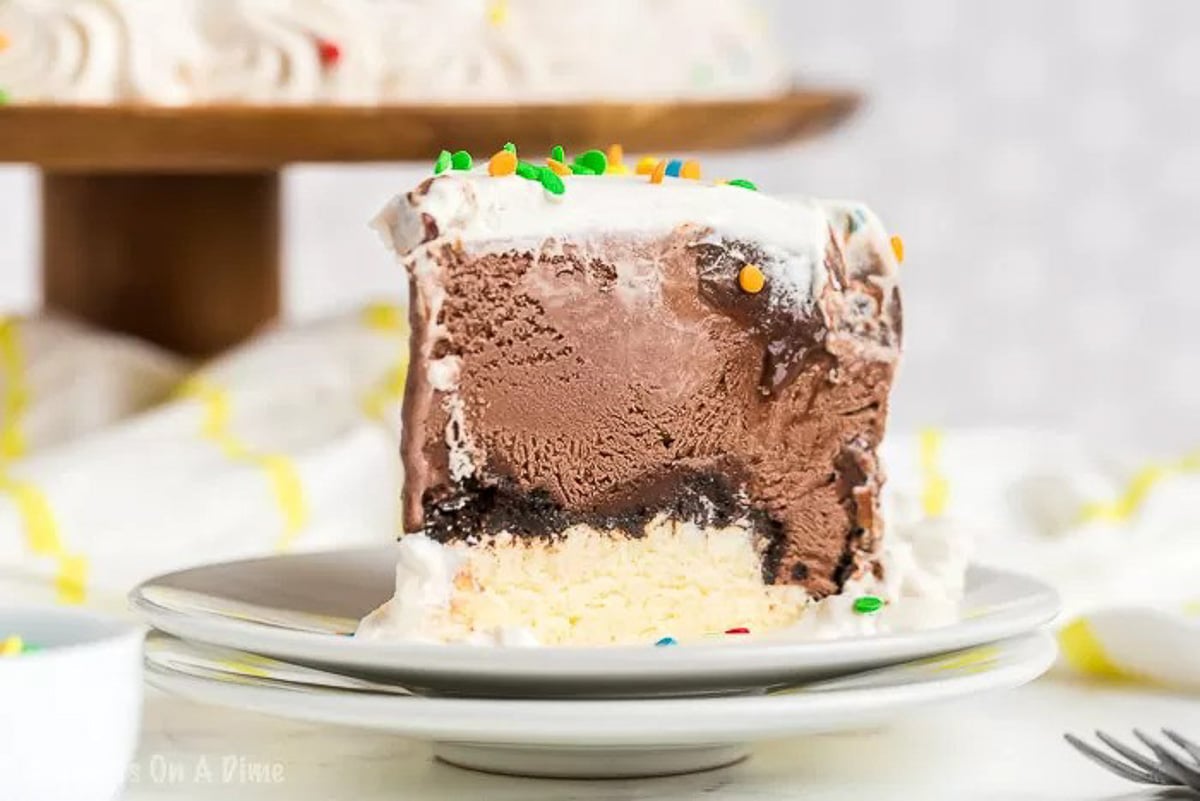
Step 7. Next, add the cookie crumbles to the top of the fudge layer. Freeze for about 2 hours. It should be firm. Soften the vanilla ice cream 15 minutes before you need it. Then add to the top of the cake and freeze. Once frozen, use the clear wrap to lift the frozen cake out of the pan. Then place on a cardboard cake circle or a serving plate. Set it back in the freezer.

Step 8. Make the whipped cream by adding the heavy whipping cream, powdered sugar and vanilla extract to a large bowl. Beat on high speed until stiff peaks form. Frost the cake with the whipped cream frosting using an offset spatula and decorate based on preference. Finally, freeze the cake until ready to serve. Place on a serving platter when ready to enjoy. Slice directly from frozen for clean cuts and perfect layers.
Storage
Keep the ice cream cake frozen in an airtight container or tightly wrapped with plastic wrap to preserve texture and flavor. The cake is best eaten within 4-5 days.
If needed, let the cake sit at room temperature for a few minutes before serving to make slicing easier.
Pro Tips
- Add a cake layer: Place a layer of cake at the bottom or between ice cream layers for extra structure and flavor.
- Freeze each layer: Freeze each layer before adding the next to keep layers neat and prevent melting.
- Remove air pockets: Gently press each ice cream layer to eliminate air bubbles and create smooth, even layers.
- Soften ice cream: Let ice cream sit a few minutes before spreading to make it easier to work with and avoid tearing.
- Clean slices: Use a sharp knife dipped in hot water for neat slices, wiping the knife between each cut.
- Line the pan: Use plastic wrap or parchment paper for easy removal and clean edges.
- Serving temperature: Serve straight from frozen for firm slices, or let sit a few minutes for slightly softer pieces.
- Add toppings last: Sprinkles, chocolate drizzle, caramel, or cookie crumbs are best added just before serving.
- Customize layers: Alternate ice cream, cake, cookie, or fudge layers for a fun, personalized cake.
Try More Ice Cream Cake Recipes
- Easy Ice Cream Cake Recipe
- Snickers Ice Cream Cake
- The Easiest Cookies and Cream Ice Cream Cake Recipe
- Oreo Ice Cream Cake Recipe
- Mint Chocolate Chip Ice Cream Cake
- Melted Ice Cream Cake Recipe
Indulge in this Copycat Dairy Queen ice cream cake and delight your family and friends with layers of creamy ice cream, rich chocolate, and fluffy whipped topping. Save this recipe, share your favorite variations in the comments, and don’t forget to leave a star rating to let others know how much you enjoyed it. Perfect for birthdays, parties, or any celebration, this dessert is sure to impress every crowd.

Dairy Queen Ice Cream Cake
Ingredients
- Cake:
- 3/4 cup Oreo crumbs about 10 Oreos crushed
- 1.5 quart container vanilla ice cream
- 1.5 quart container chocolate ice cream
- 6 oz semi sweet chocolate chips
- 3 tbsp light corn syrup
- 1/2 tsp vanilla extract
- 1/2 cup heavy whipping cream
- WHIPPED CREAM:
- 2 cups heavy whipping cream cold
- 1 cup powdered sugar
- 2 tsp vanilla extract
- Sprinkles
See how we calculate recipe costs.
Instructions
- Crush the Oreos and set aside.
- Line an 8×3 inch cake pan with clear wrap that covers the bottom and goes above the sides of the cake pan. I used two pieces.
- About 20 minutes before you need it, set the chocolate ice cream out to soften. Add the softened chocolate ice cream to the prepared cake pan and spread into an even layer. Freeze for 30 minutes.
- To make the fudge layer, add the chocolate chips, corn syrup and vanilla extract to a medium sized bowl.
- Heat the heavy whipping cream just until it begins to boil, then pour it over the chocolate chips. Allow to sit for 2-3 minutes, the whisk until smooth.
- Remove the cake pan with the chocolate ice cream from the freezer, then pour the chocolate fudge over the ice cream and spread into an even layer. Freeze for about 10 minutes.
- Add the cookie crumbles to the top of the fudge layer, then freeze for about 2 hours, until mostly firm.
- About 20 minutes before you need it, set the vanilla ice cream out to soften. Add the vanilla ice cream to the top of the cake, then freeze until firm, 2-3 hours.
- Use the clear wrap to lift the frozen cake out of the pan, then place it on a cardboard cake circle or a serving plate. Set it back in the freezer.
- To make the whipped cream, add the heavy whipping cream, powdered sugar and vanilla extract to a large mixer bowl. Whip on high speed until stiff peaks form.
- Frost the cake with the whipped cream and decorate as desired.
- Freeze the cake until ready to serve. Cake is best when stored well covered and eaten within 4-5 days.

Would marshmallow cream be able to be subbed for the frosting?
I haven’t tried that but it might work.
What is a 8X3 inch pan?
Linda – it’s an 8X3 inch circle cake pan.
Sounds good I’ll have try it
Mary Sue – I can’t wait for you to try it. Let me know what you think.