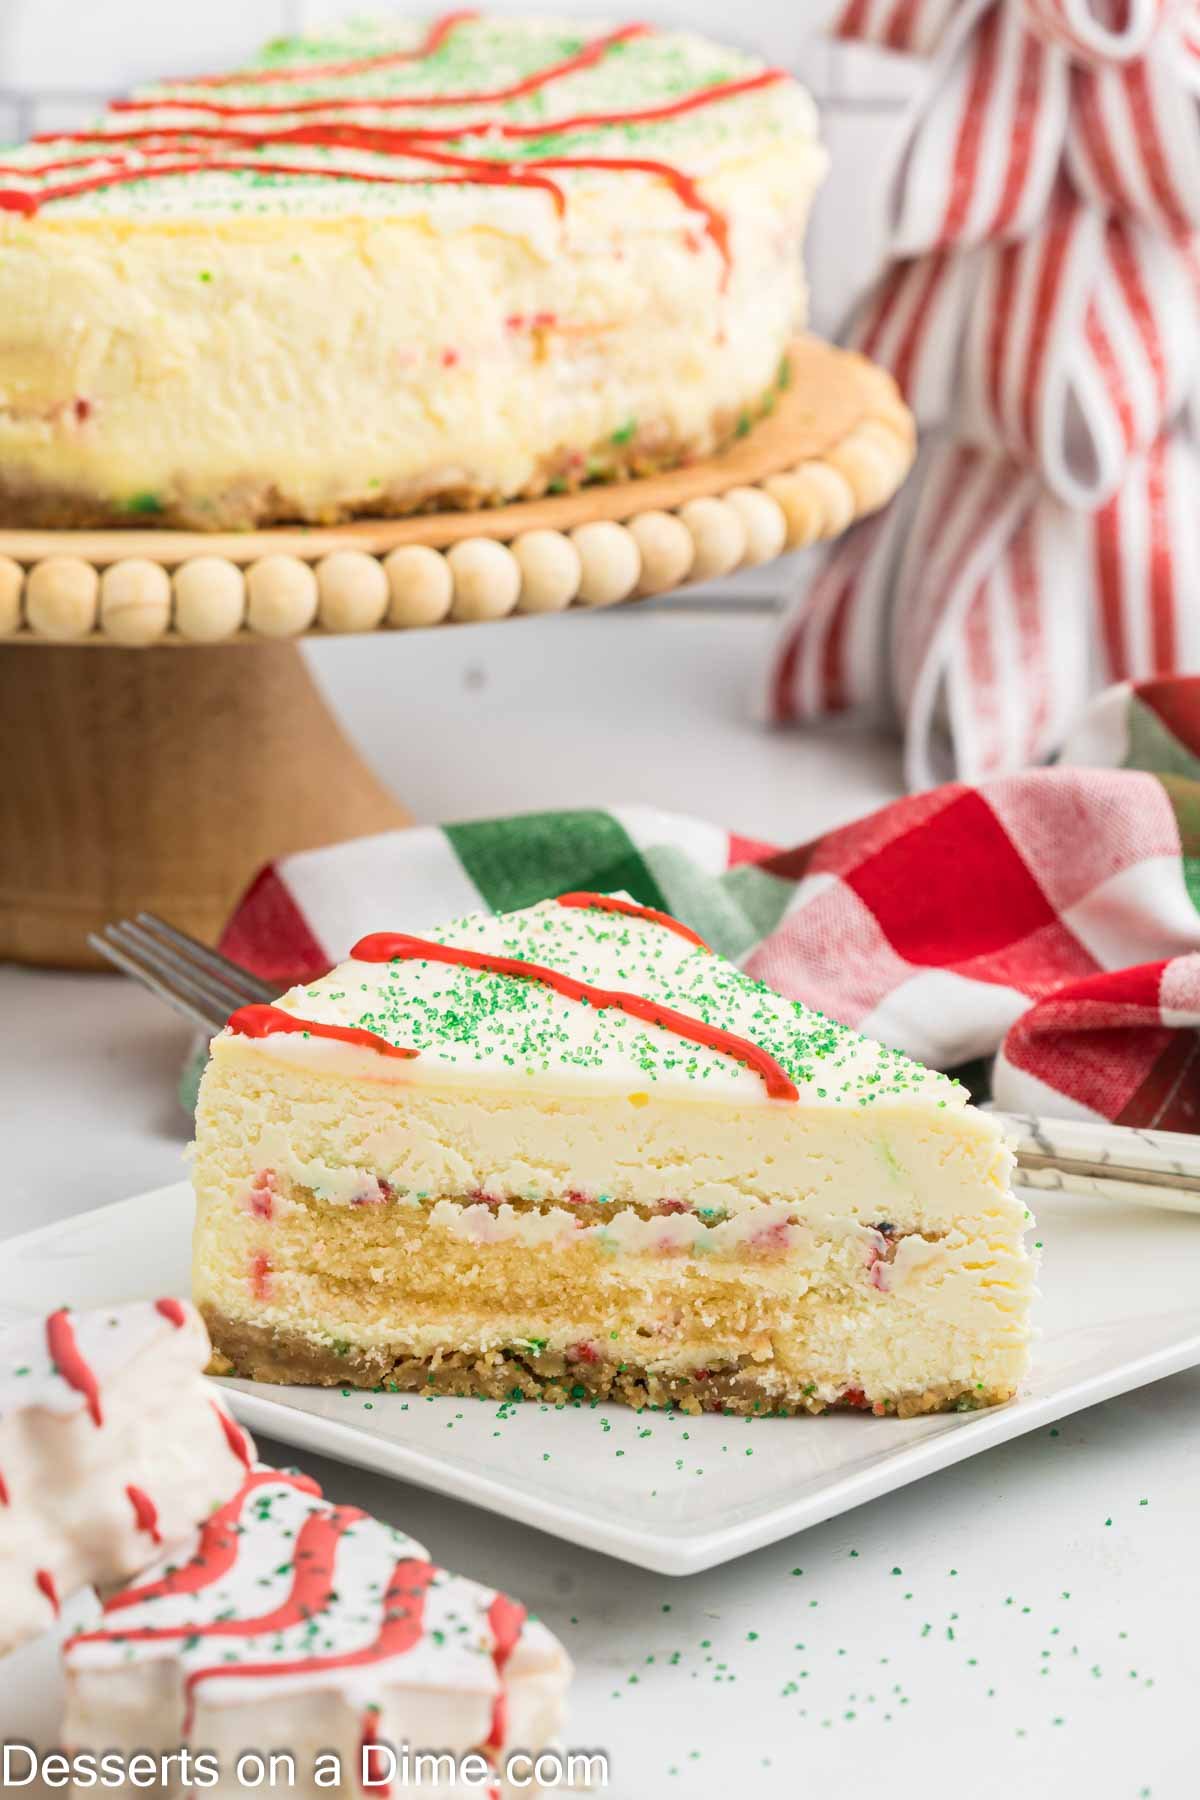
Indulge in Little Debbie Christmas Tree Cheesecake. It’s creamy, festive, and easy to enjoy. Perfect for holiday desserts, parties, or sweet treats for the season.

Little Debbie Christmas Tree Cheesecake is a festive, creamy dessert that’s perfect for the holiday season. With its signature layered flavor, it’s a sweet treat that’s easy to serve for a special holiday indulgence.
Each slice offers a rich, creamy texture topped with festive decorations, making it a crowd-pleaser for both kids and adults. Whether enjoyed on its own or paired with hot cocoa, this holiday dessert brings joy and holiday cheer to any table.
I started making this several years ago and my kids look forward to it every year. They go crazy over the Christmas Tree snack cakes, and we also make Little Debbie Christmas Tree Cake Balls and Little Debbie Christmas Tree Dip.
Table of contents
Why We Love This
- Festive and fun: It’s perfect for holiday celebrations and adds a cheerful touch to any dessert table.
- Creamy and delicious: Smooth, rich cheesecake that melts in your mouth with every bite.
- Convenient: Easy to serve, making holiday entertaining simple.
- Kid-friendly: Loved by children and adults alike, ideal for family gatherings.
- Perfect for parties: Easy to slice and serve, making it a hassle-free holiday treat.
Ingredients
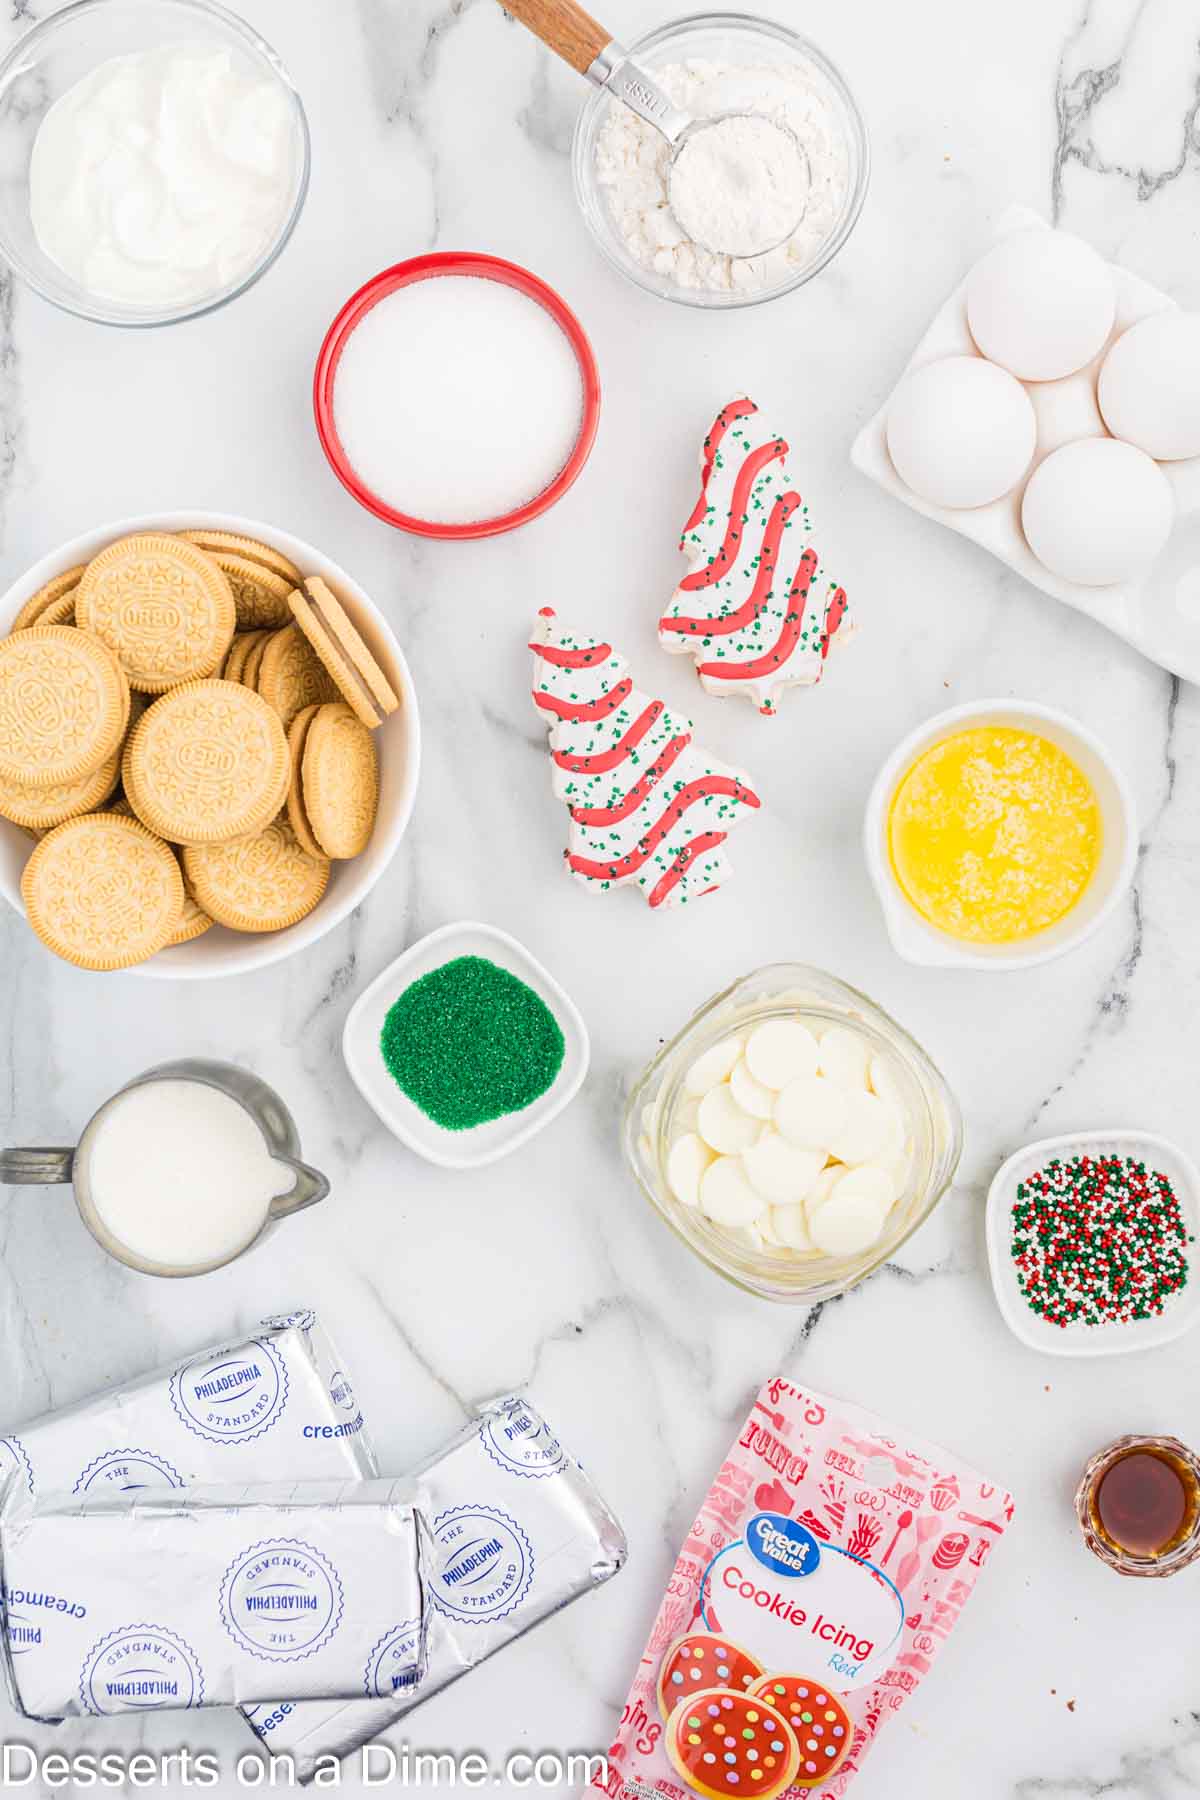
Crust
- Golden Oreos: Crushed into fine crumbs to form the base of the cheesecake, providing a sweet and sturdy crust.
- Butter: Melted and mixed with the cookie crumbs to help the crust hold together and add rich flavor.
- Christmas Nonpareils Sprinkles: Use nonpareils instead of other sprinkles, as they hold their shape and color without bleeding during baking or assembly.
Filling
- Cream Cheese: Softened at room temperature; use the brick-style cream cheese for the best texture and flavor.
- Sugar: Plain granulated sugar to sweeten the filling evenly.
- Vanilla Extract: Adds a perfect hint of vanilla flavor to the creamy cheesecake filling.
- Full-Fat Sour Cream: Provides richness and smooth texture; avoid using light sour cream, as it affects the flavor and consistency.
- Eggs: Large, room-temperature eggs help the filling combine easily and bake evenly.
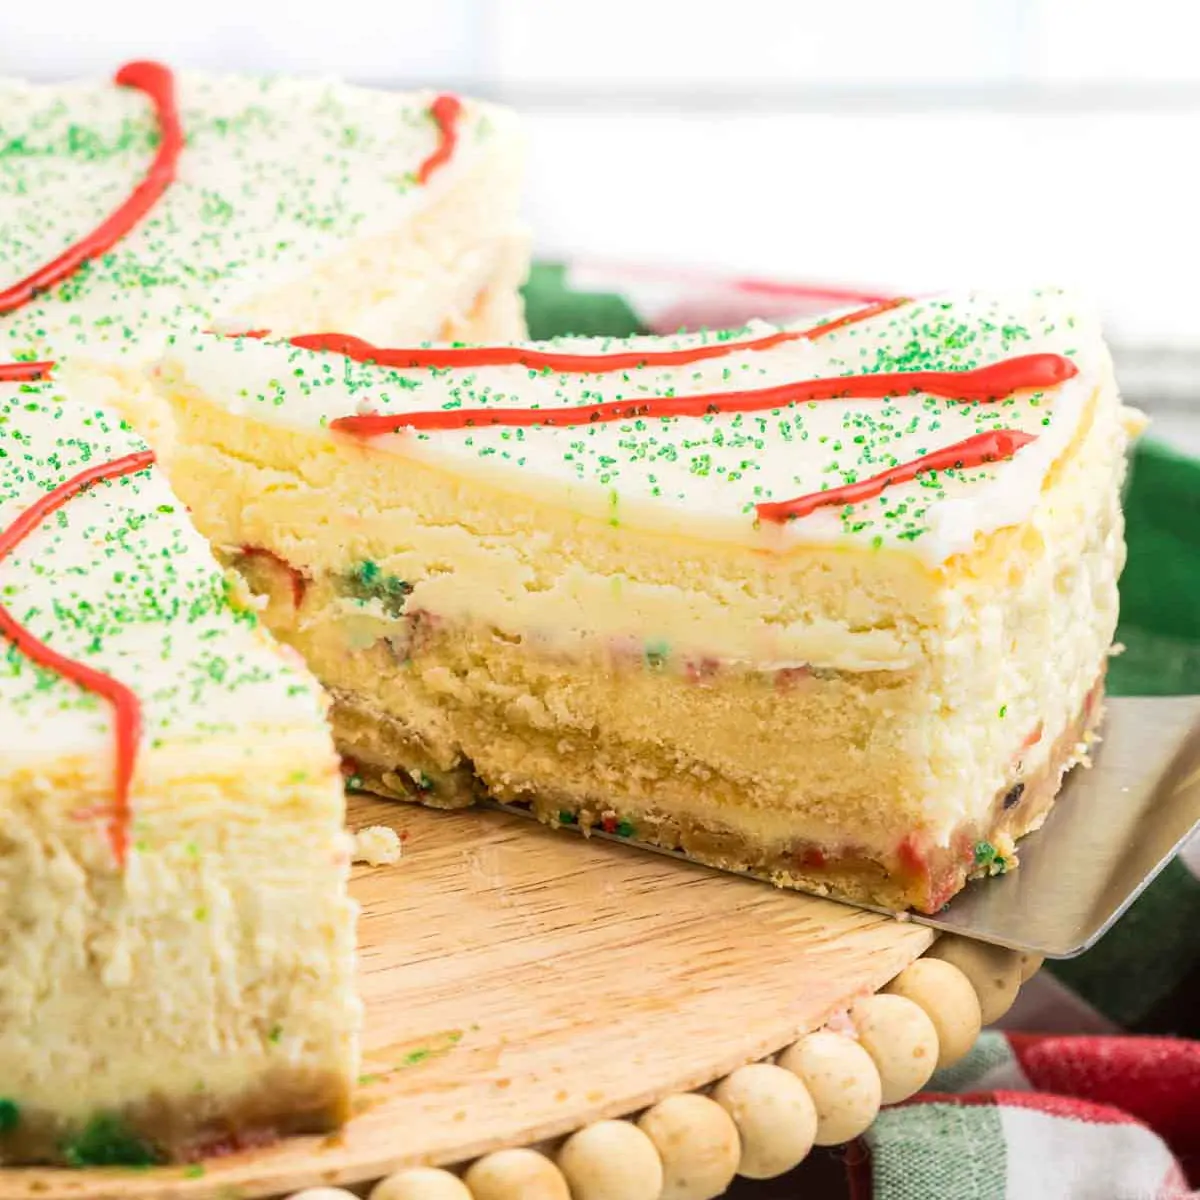
- Little Debbie Christmas Tree Cakes: The star ingredient of the dessert, adding festive charm and flavor to the cheesecake.
Ganache Topping
- White Baking Chocolate: Use high-quality chocolate for a smooth, creamy topping.
- Heavy Whipping Cream: Essential for making a rich ganache; do not substitute with regular milk.
- Green Sanding Sprinkles: Create the look of a Little Debbie Christmas Tree and add a festive touch.
- Red Store-Bought Cookie Frosting: Easy to pipe decorative stripes on the cheesecake for a colorful finish.
Get the entire list of ingredients at the bottom of the page.
Variations to Recipe
- Chocolate Flavor: Swap the Little Debbie Christmas Trees for Chocolate Christmas Trees if available for a richer dessert.
- Crust Options: Use graham cracker crumbs or vanilla wafers instead of Golden Oreo cookies. If using Chocolate Christmas Trees, try a classic Oreo crust for a chocolatey twist.
- Topping Swap: Prefer milk chocolate? Substitute milk chocolate for the white baking chocolate for a softer, sweeter ganache.
- Festive Colors: Use different colored sprinkles or icing to match holiday themes or personalize for parties.
- Mini Cheesecakes: Make individual servings by using cupcake liners or a mini cheesecake pan.
- Flavor Extracts: Add a hint of almond or peppermint extract to the filling for a seasonal flavor variation.
- Nutty Twist: Sprinkle finely chopped nuts like pecans or almonds on top for added texture and flavor.
Step By Step Instructions
- Step 1. Before you get started, go ahead and preheat the oven to 325 degrees Fahrenheit.
- Step 2. Crush the Oreos in a food processor until fine crumbs.

Step 3. Next, mix together the cookie crumbs, melted butter and sprinkles in a mixing bowl.
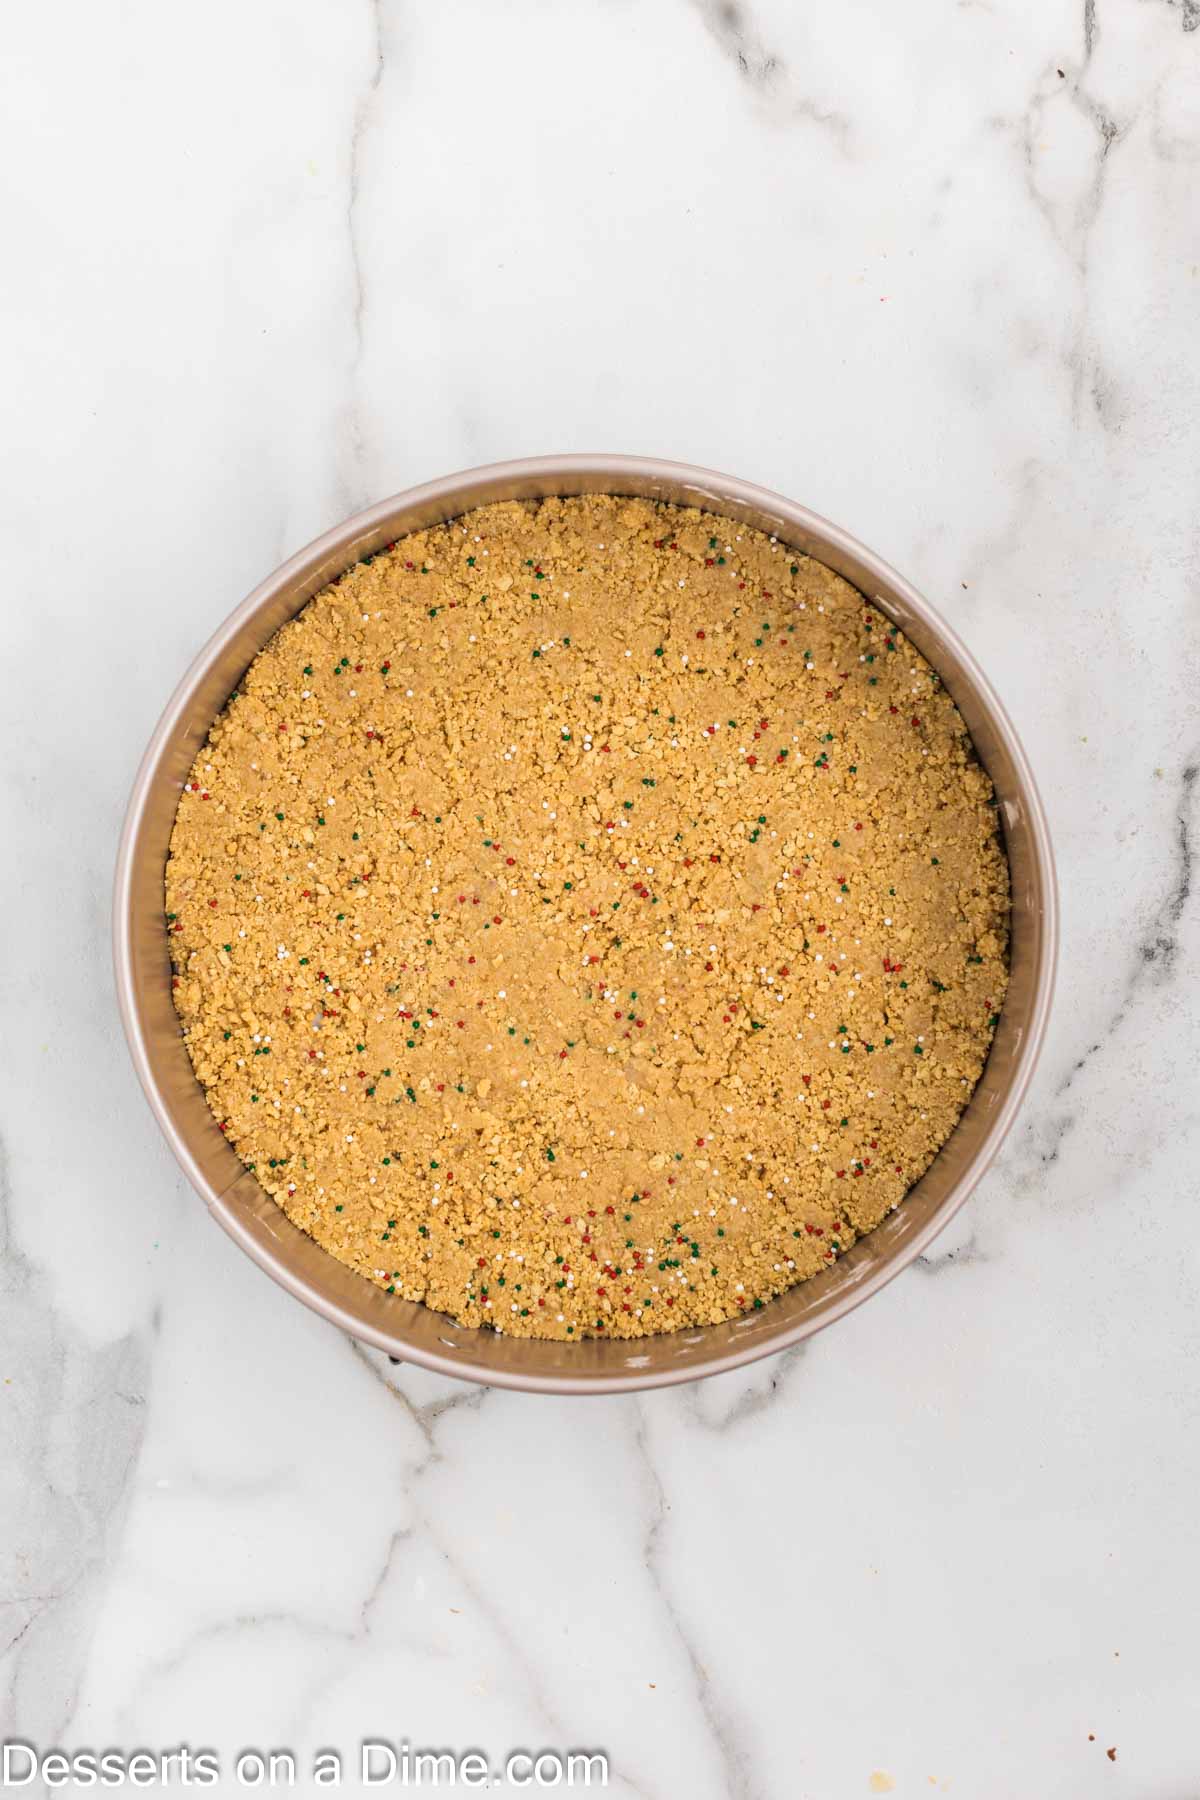
Step 4. Pour this mixture into the bottom of a 9-inch springform pan. Press the mixture up the sides of the pan about ½ inch. Bake for 8 minutes and then cool at room temperature.
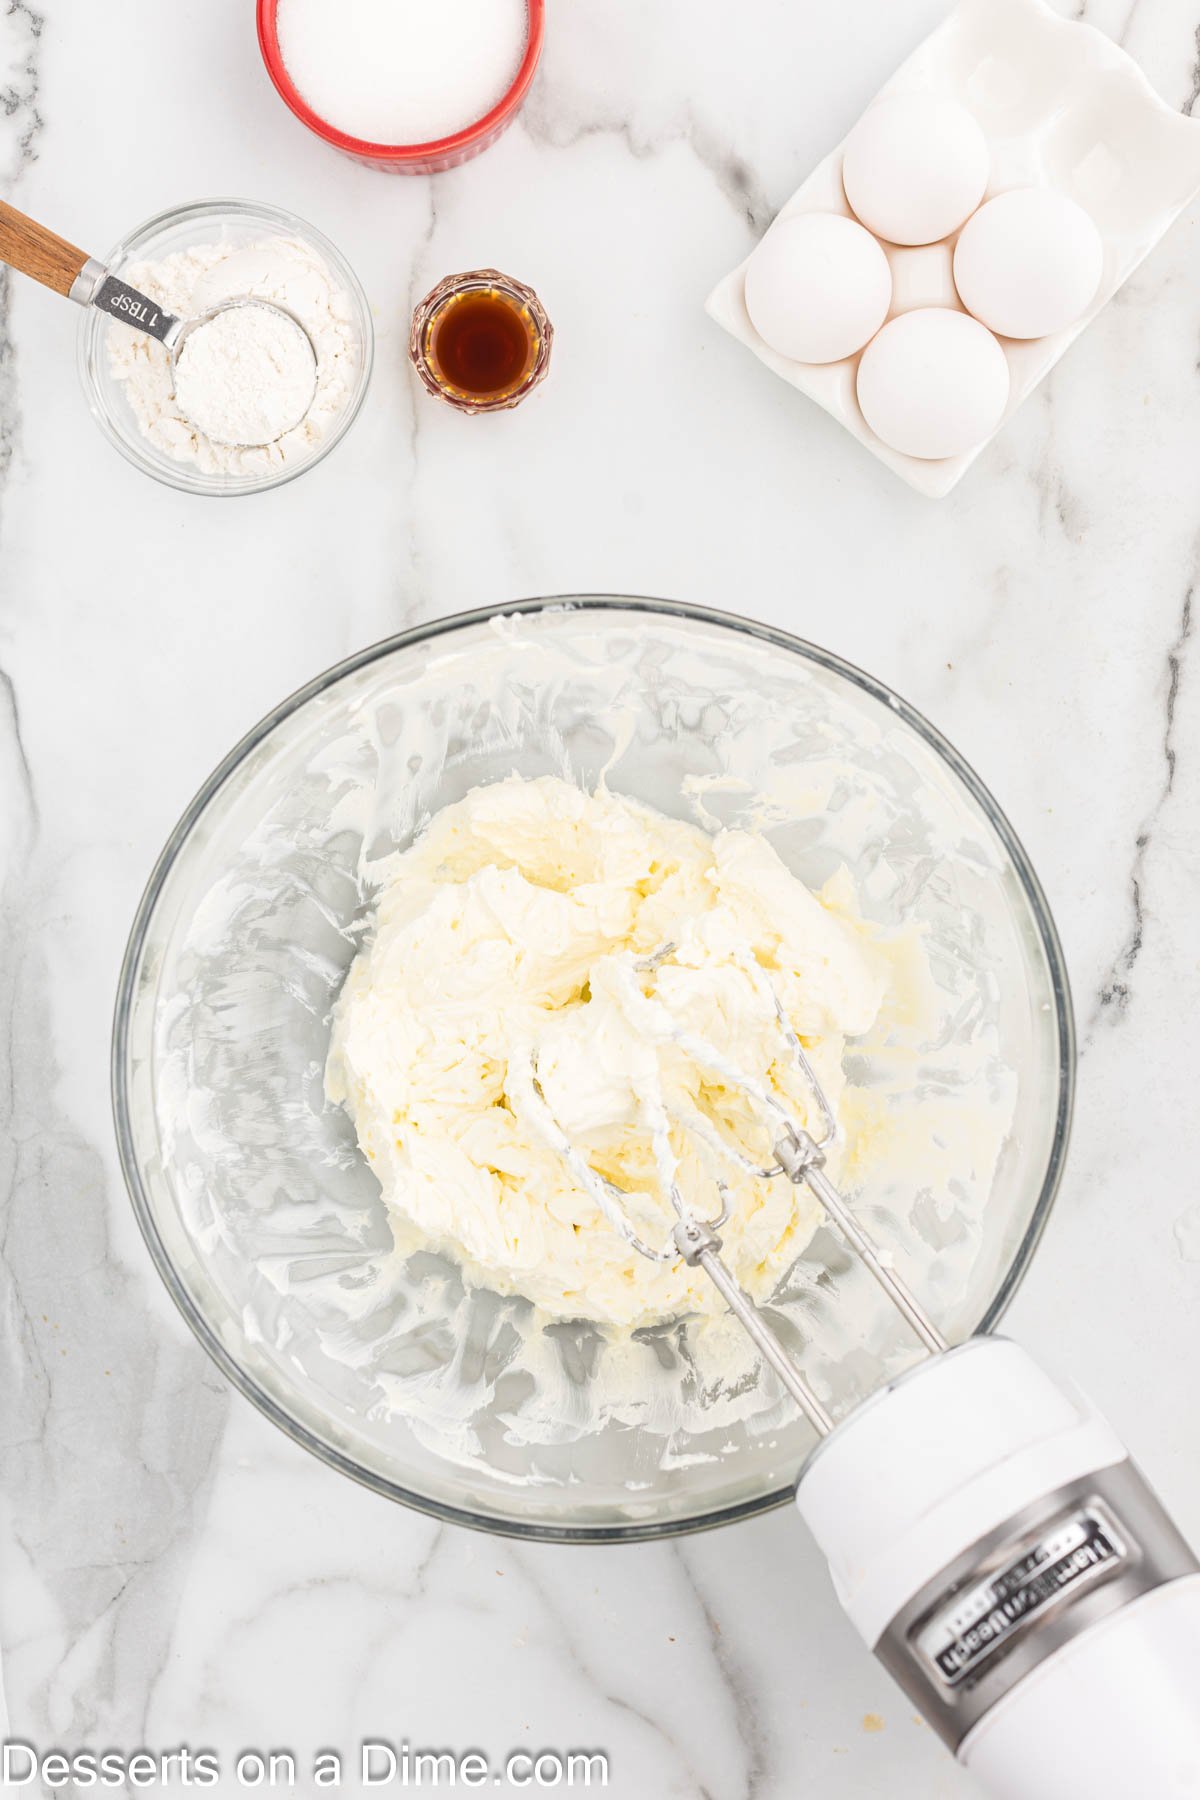
Step 5. While the crust is cooling, making the filling using an electric mixer. Beat the cream cheese until fluffy. You can use a hand mixer or stand mixer.
Step 6. Next, add the granulated sugar, flour and vanilla extract for 1-2 minutes until combined. Scrape sides of the bowl to make sure it is well blended.

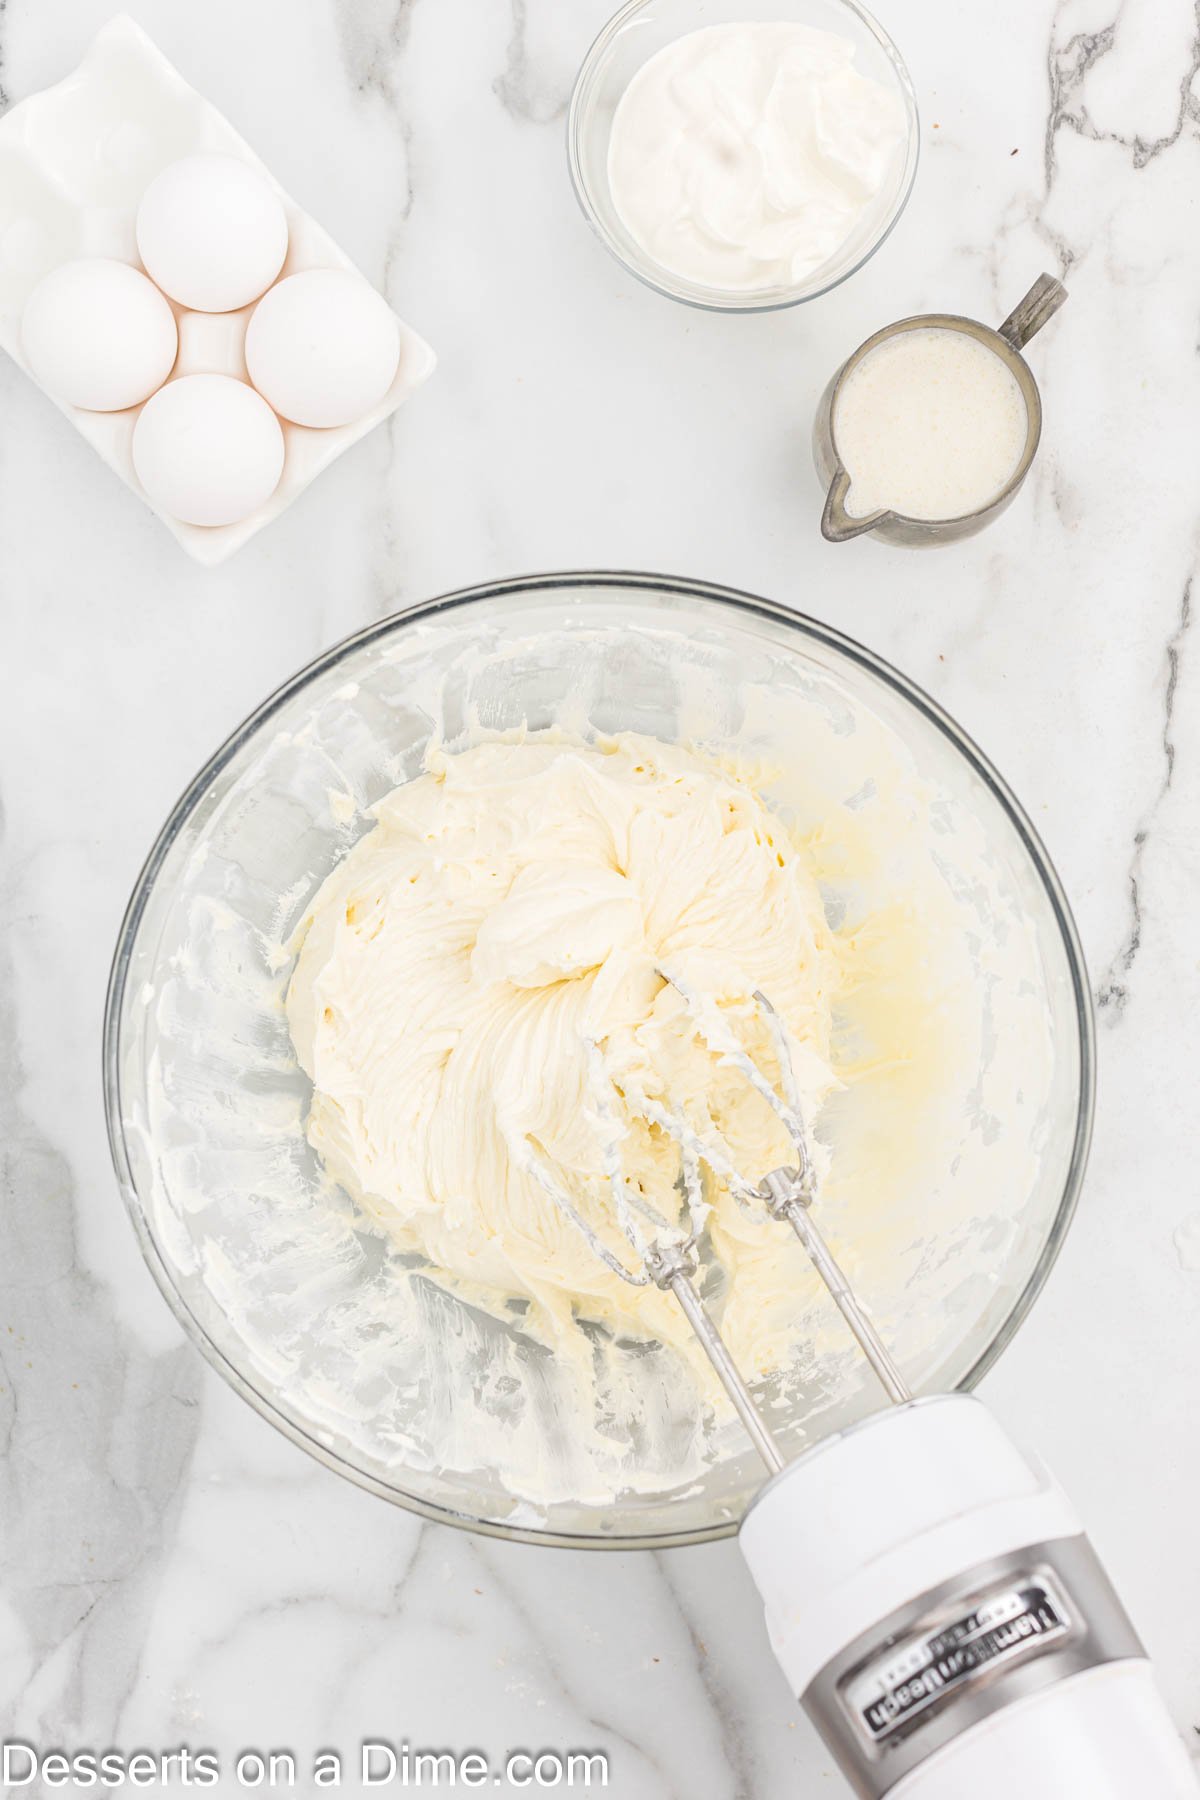
Step 7. Gradually add in the eggs, one at a time, until combined. Be careful not to over mix.
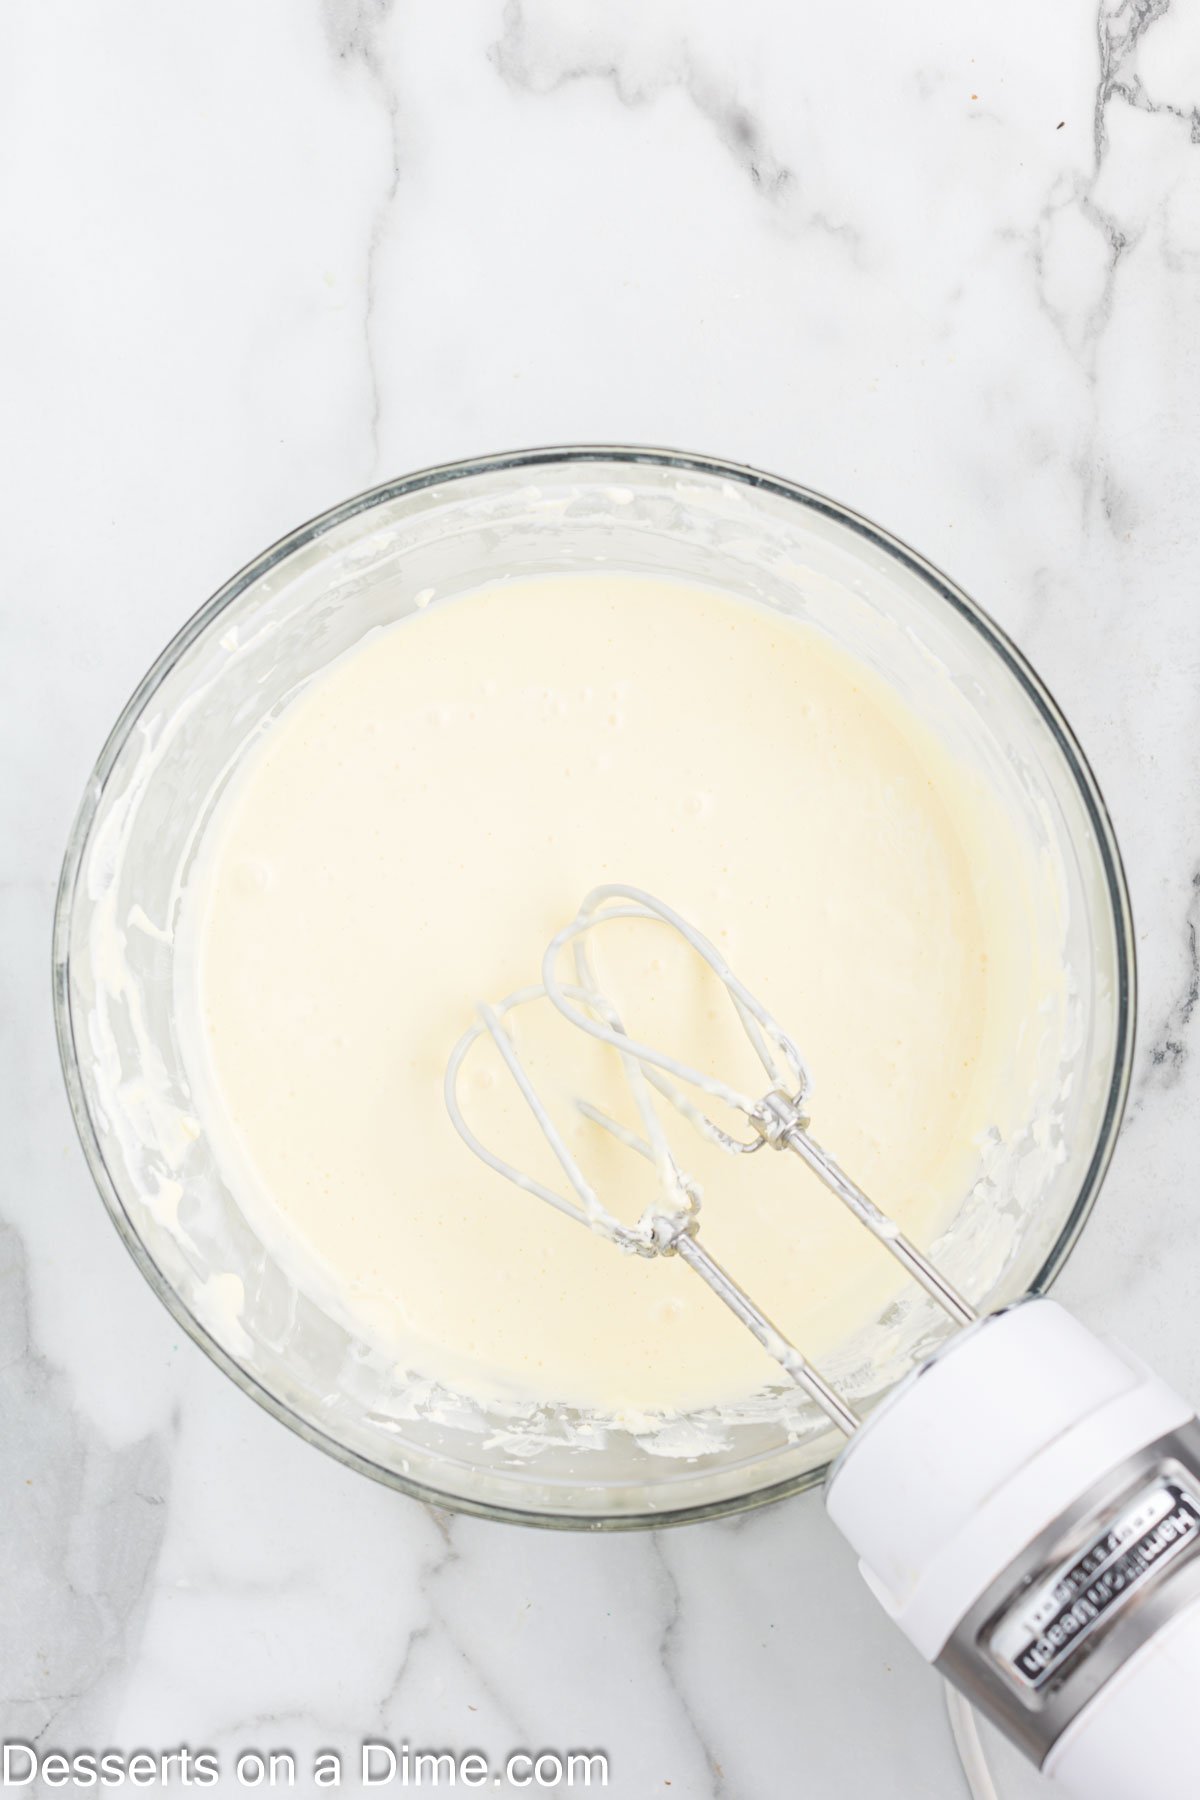
Step 8. Then mix in the sour cream and heavy cream.
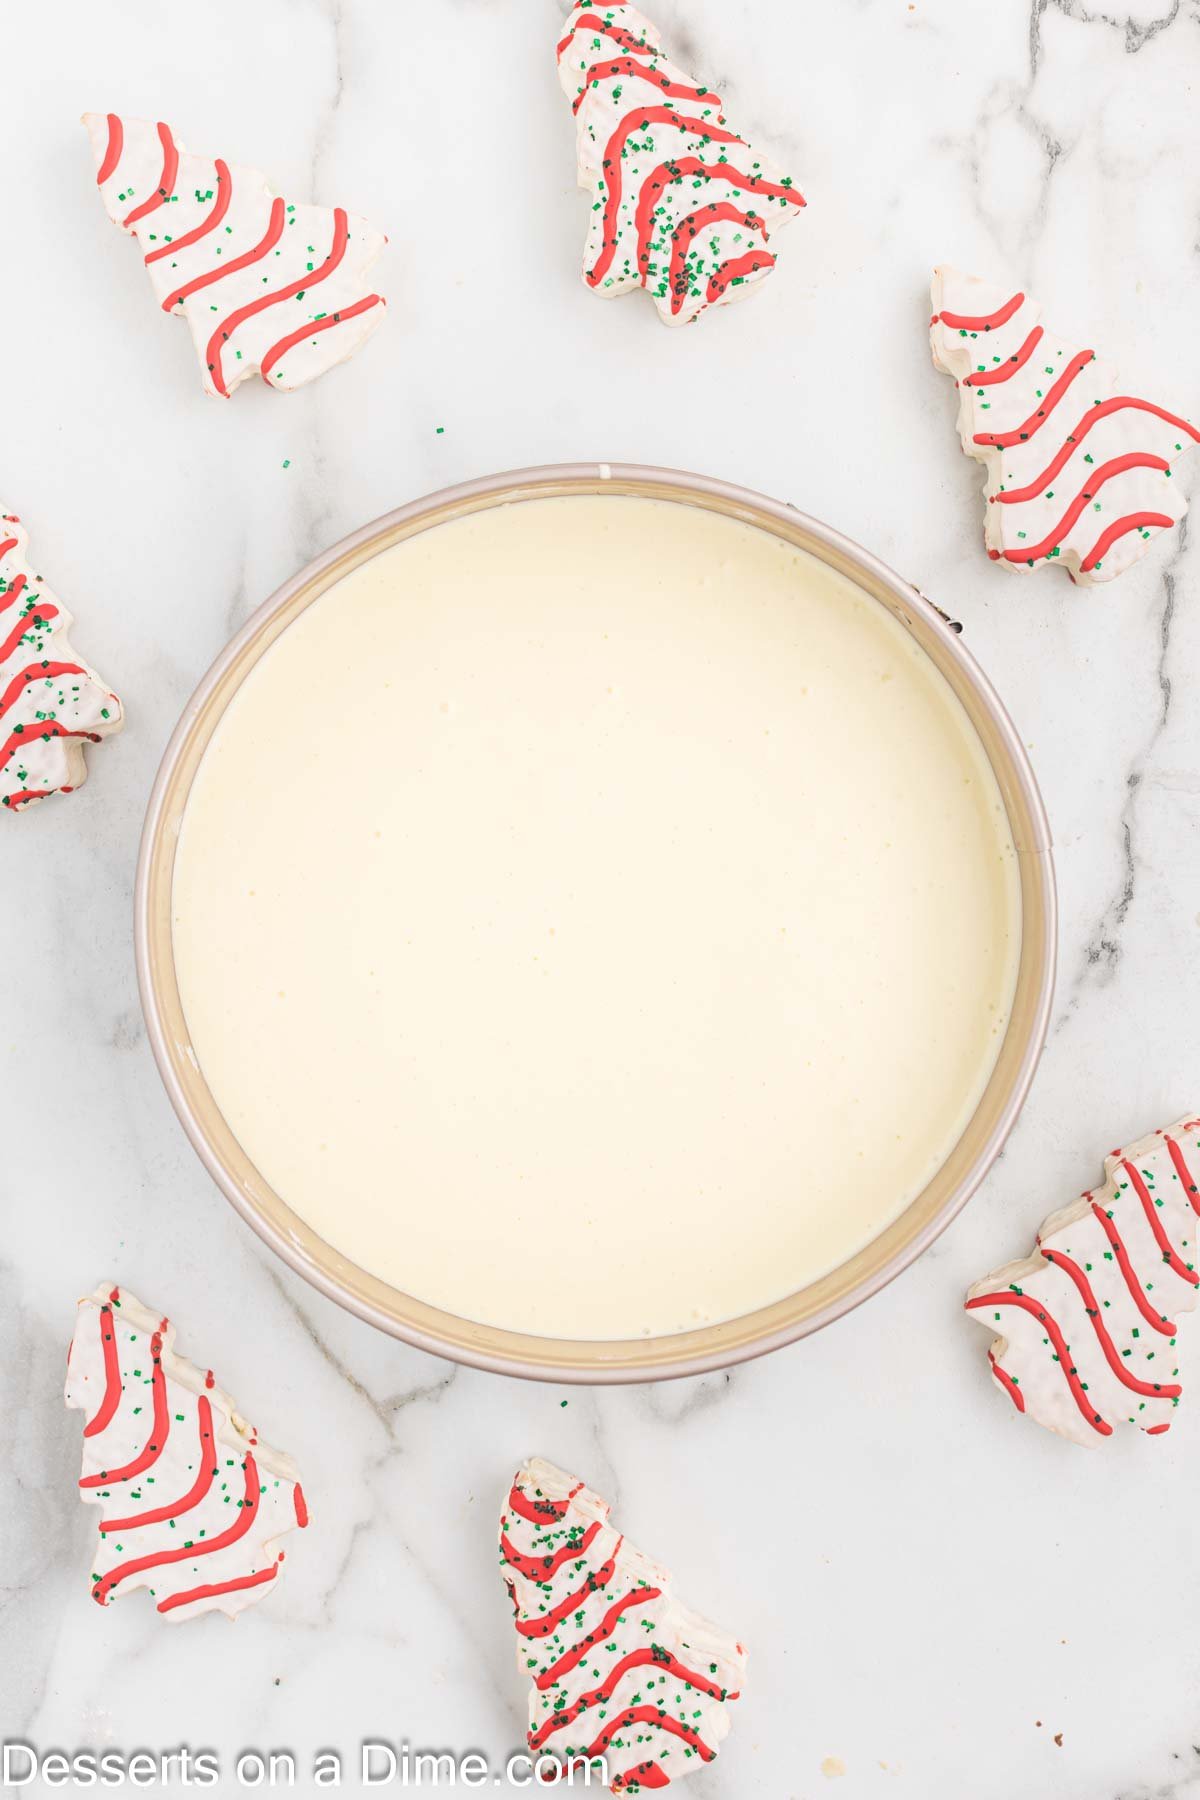
Step 9. Pour half of the filling over the crust. Smooth it out with a spatula.
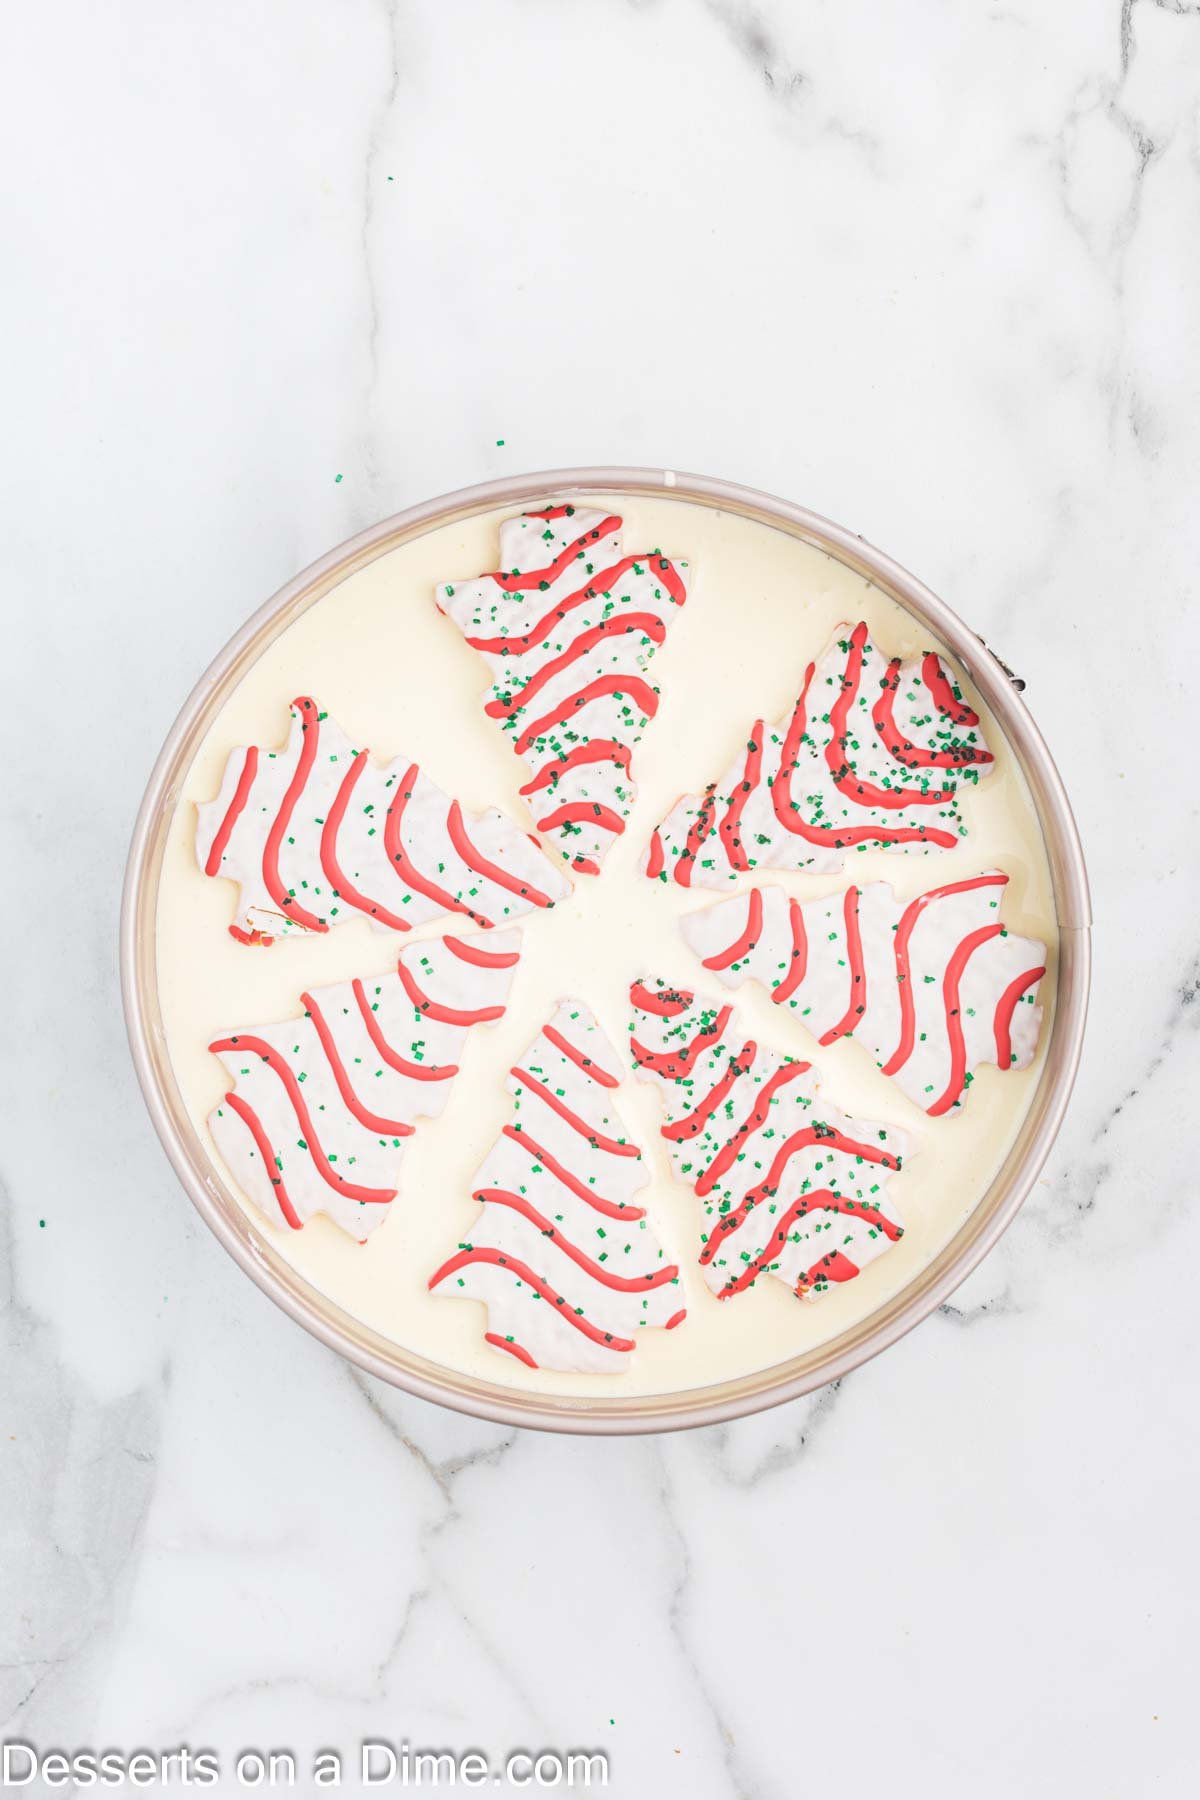
Step 9. Top the batter with the Little Debbie Cakes. Gently press them down into the batter.
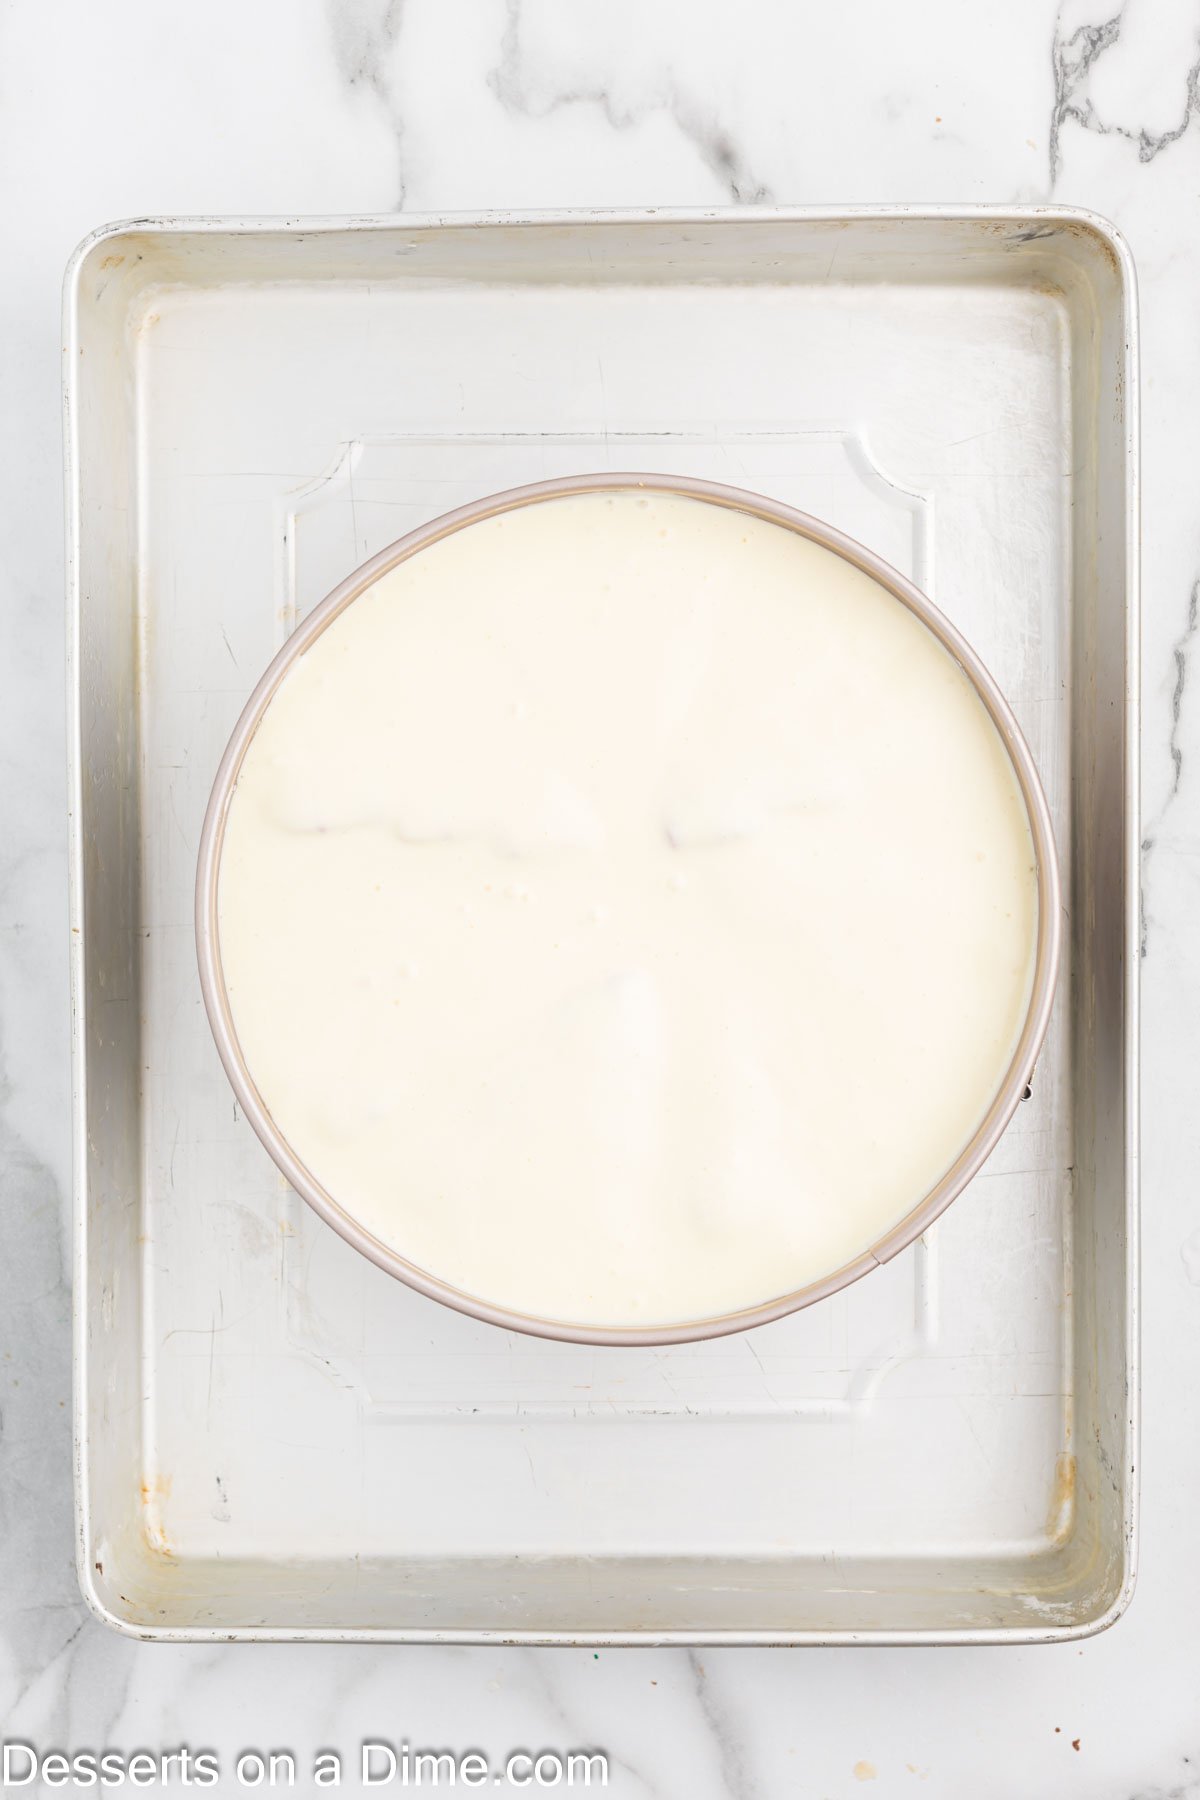
Step 10. Add the remaining cheesecake batter on top. Then gently tap the cheesecake against the counter to get out any air bubbles. Place the cheesecake pan into a large pan. Pour boiling water around the cheesecake pan until it goes about halfway up the side of the cheesecake pan. The hot water will help the cheesecake not crack.
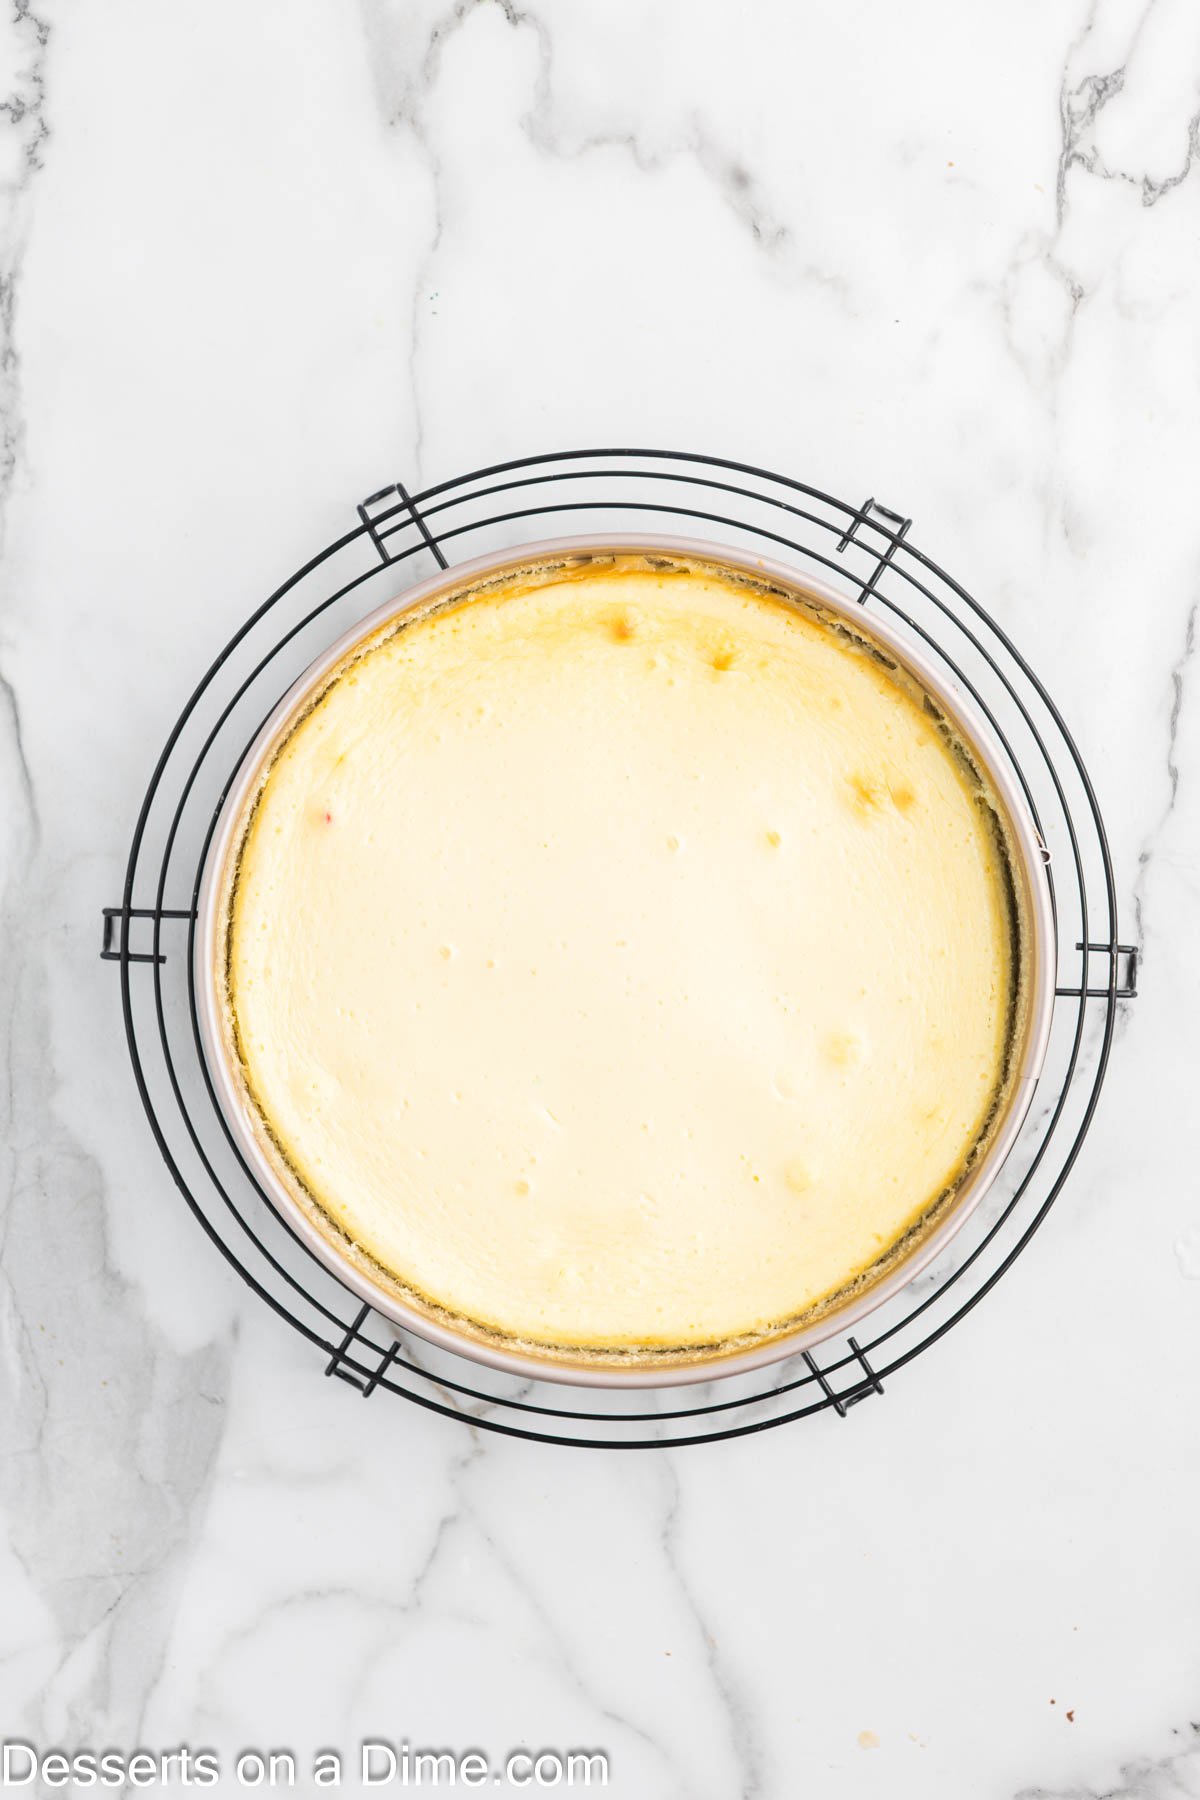
Step 11. Finally, bake the cheesecake for 55-65 minutes. The edges should be set and the center should still look jiggly. Then turn the oven off and crack the oven door. Let the cheesecake sit in the oven on the rack for 45 more minutes until the cheesecake has cooled to room temperature. Once cool, remove from the oven and the water. Allow to chill in the fridge for at least 4 hours or overnight.
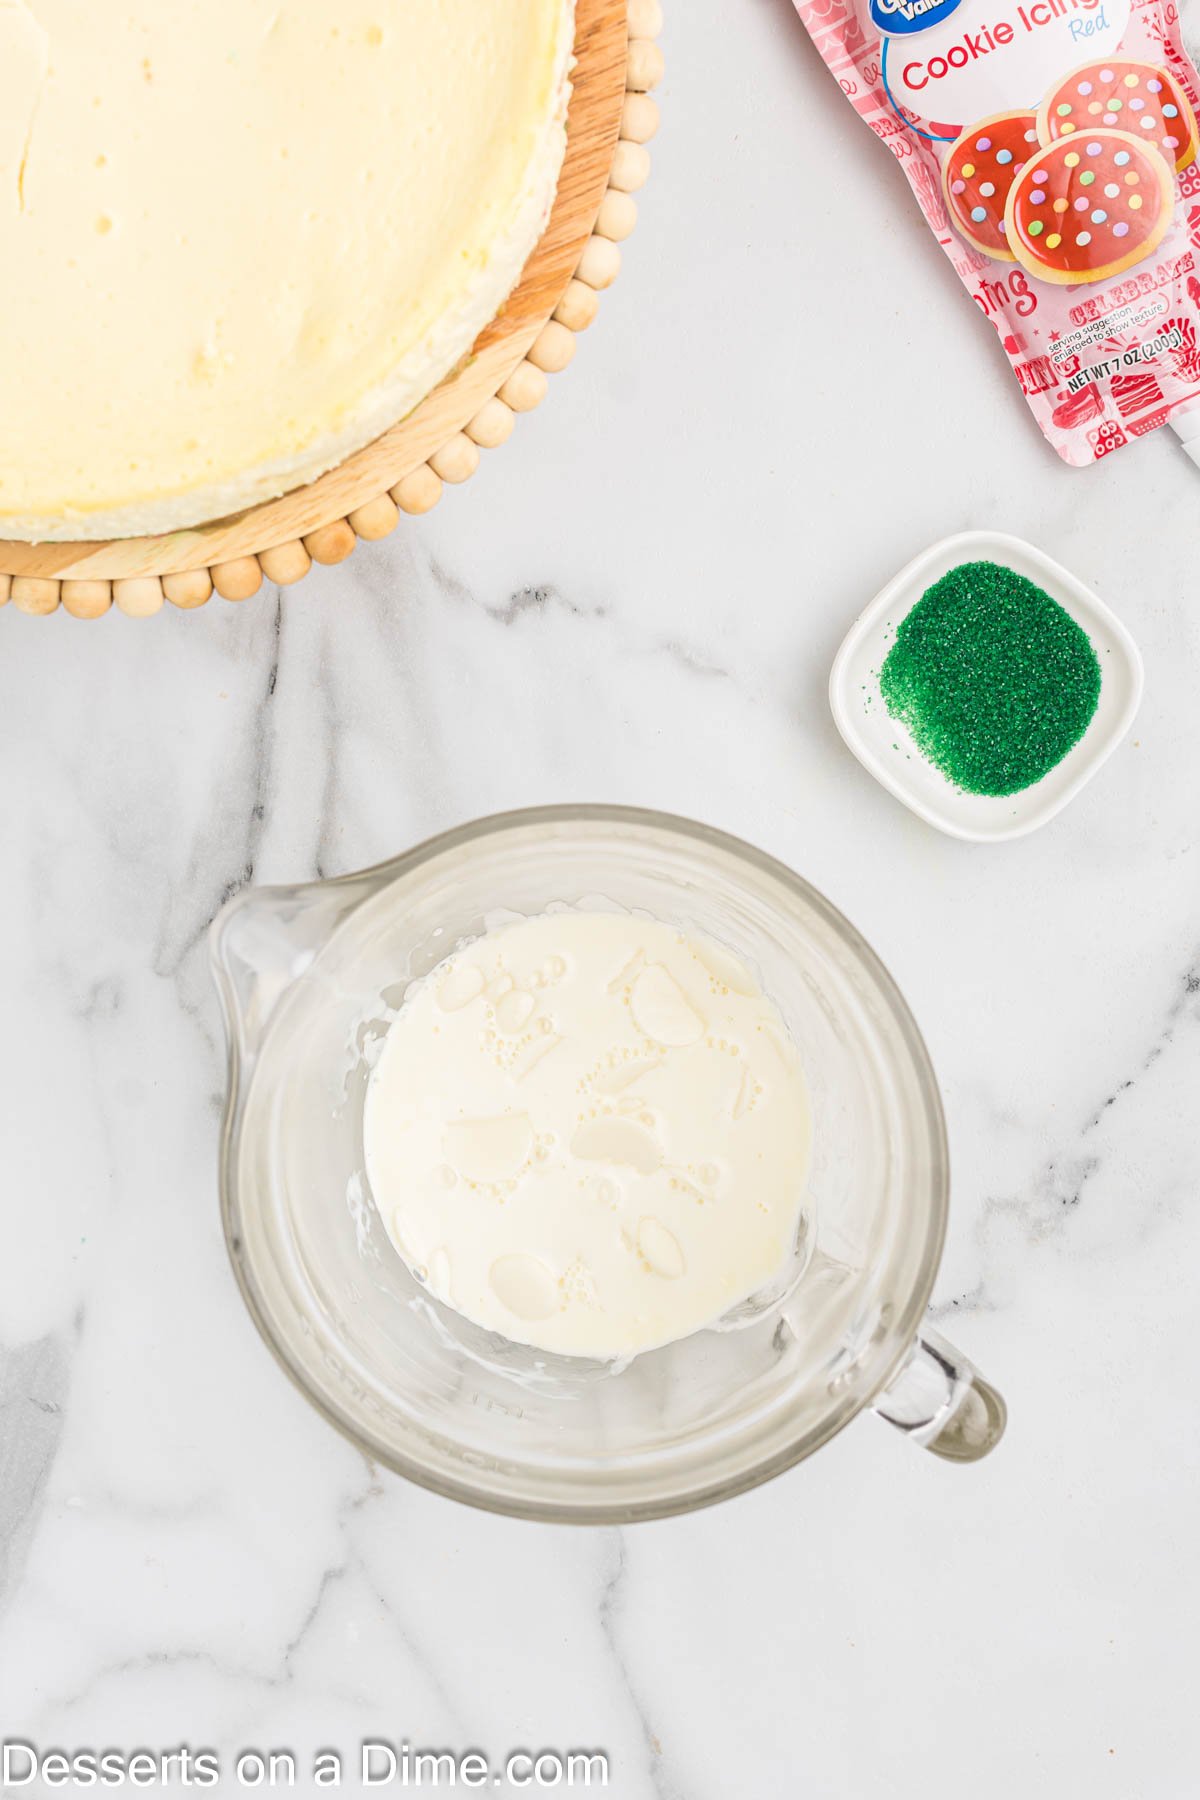
Step 12. While the cheesecake cools, make the ganache topping. Place the heavy cream in a microwave safe bowl and heat in 30 second intervals. It should be hot but not boiling. Pour the cream over the white chocolate and let sit for a few minutes. Then stir until thoroughly combined and smooth.
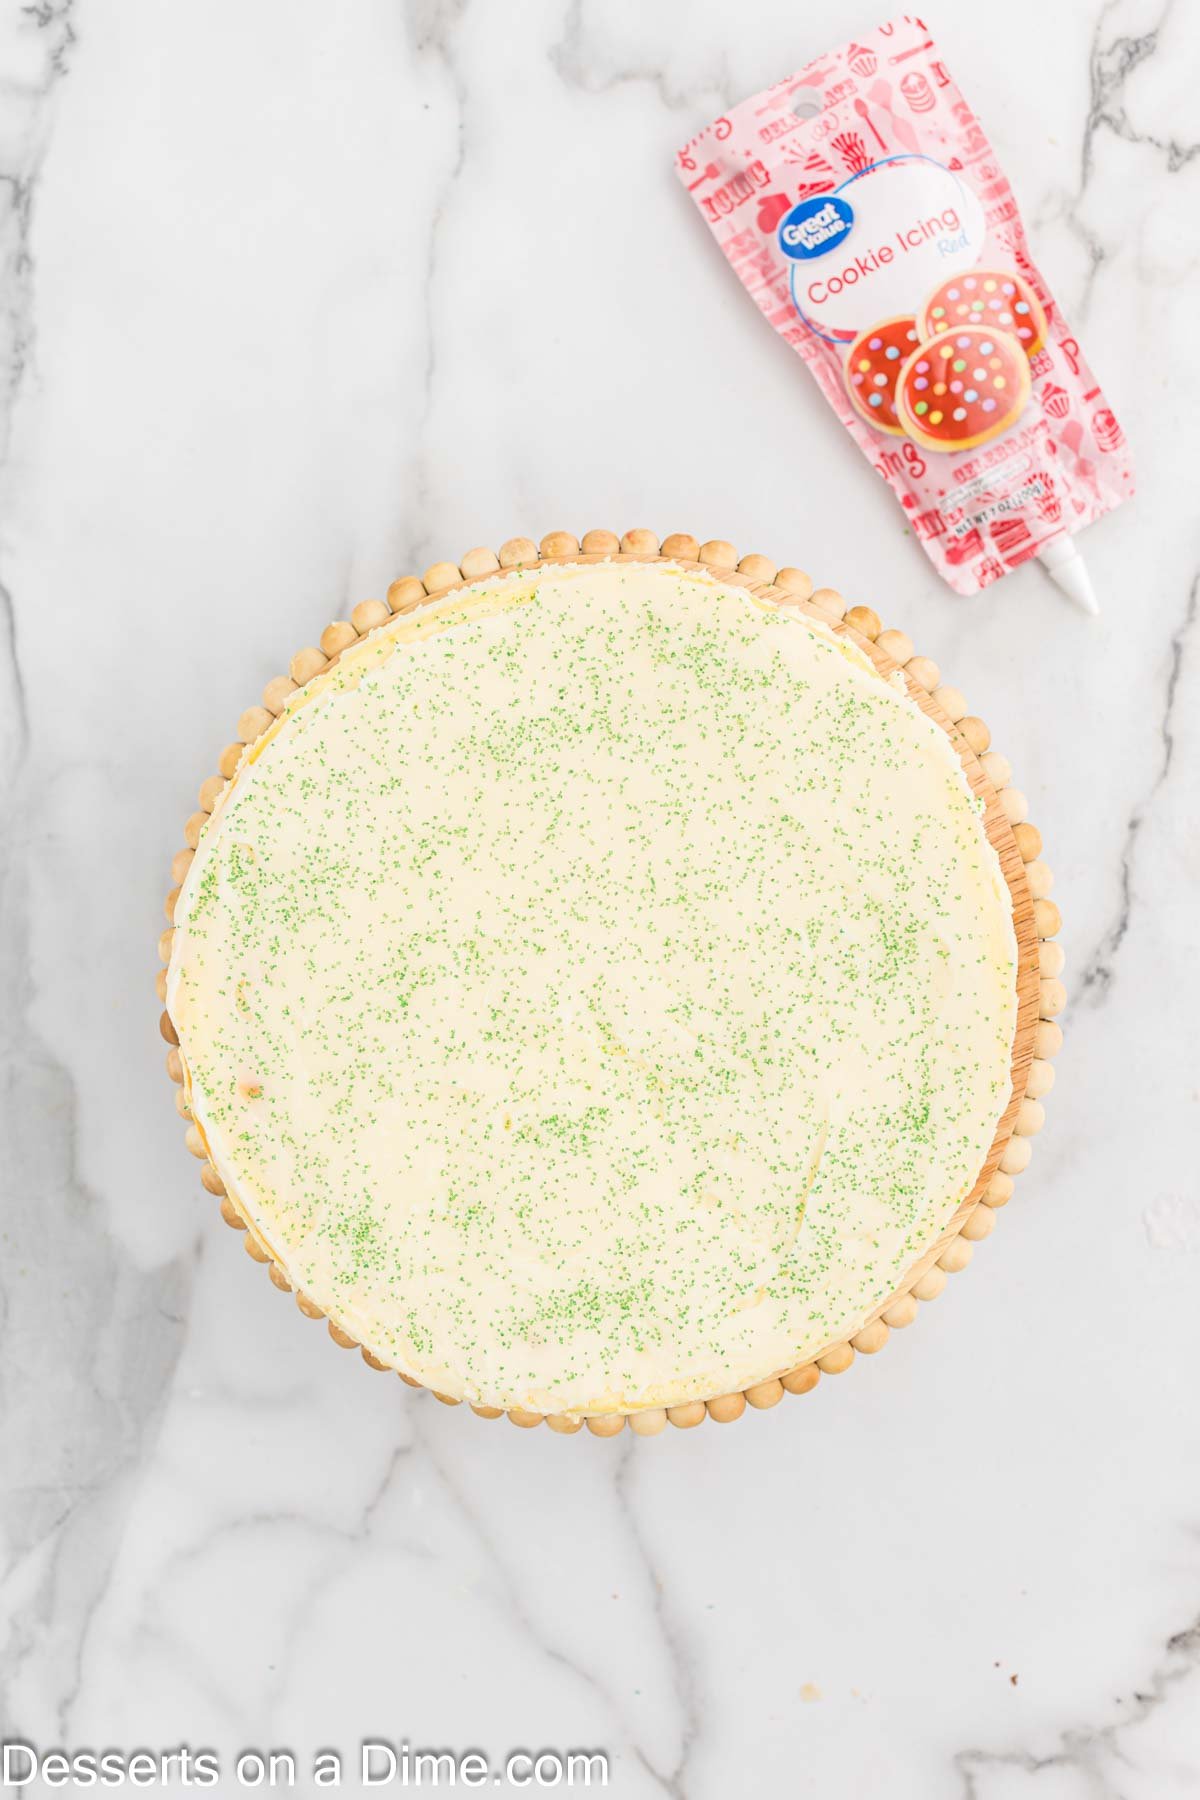
Step 13. Carefully remove the cheesecake from the springform pan. It is easiest to do by running a knife around the sides of the cheesecake to release the cheesecake from the pan. Then move the cheesecake to a serving plate. Pour the white chocolate and cream mixture over the cheesecake and smooth it out. Sprinkle the green sanding sugar on top.
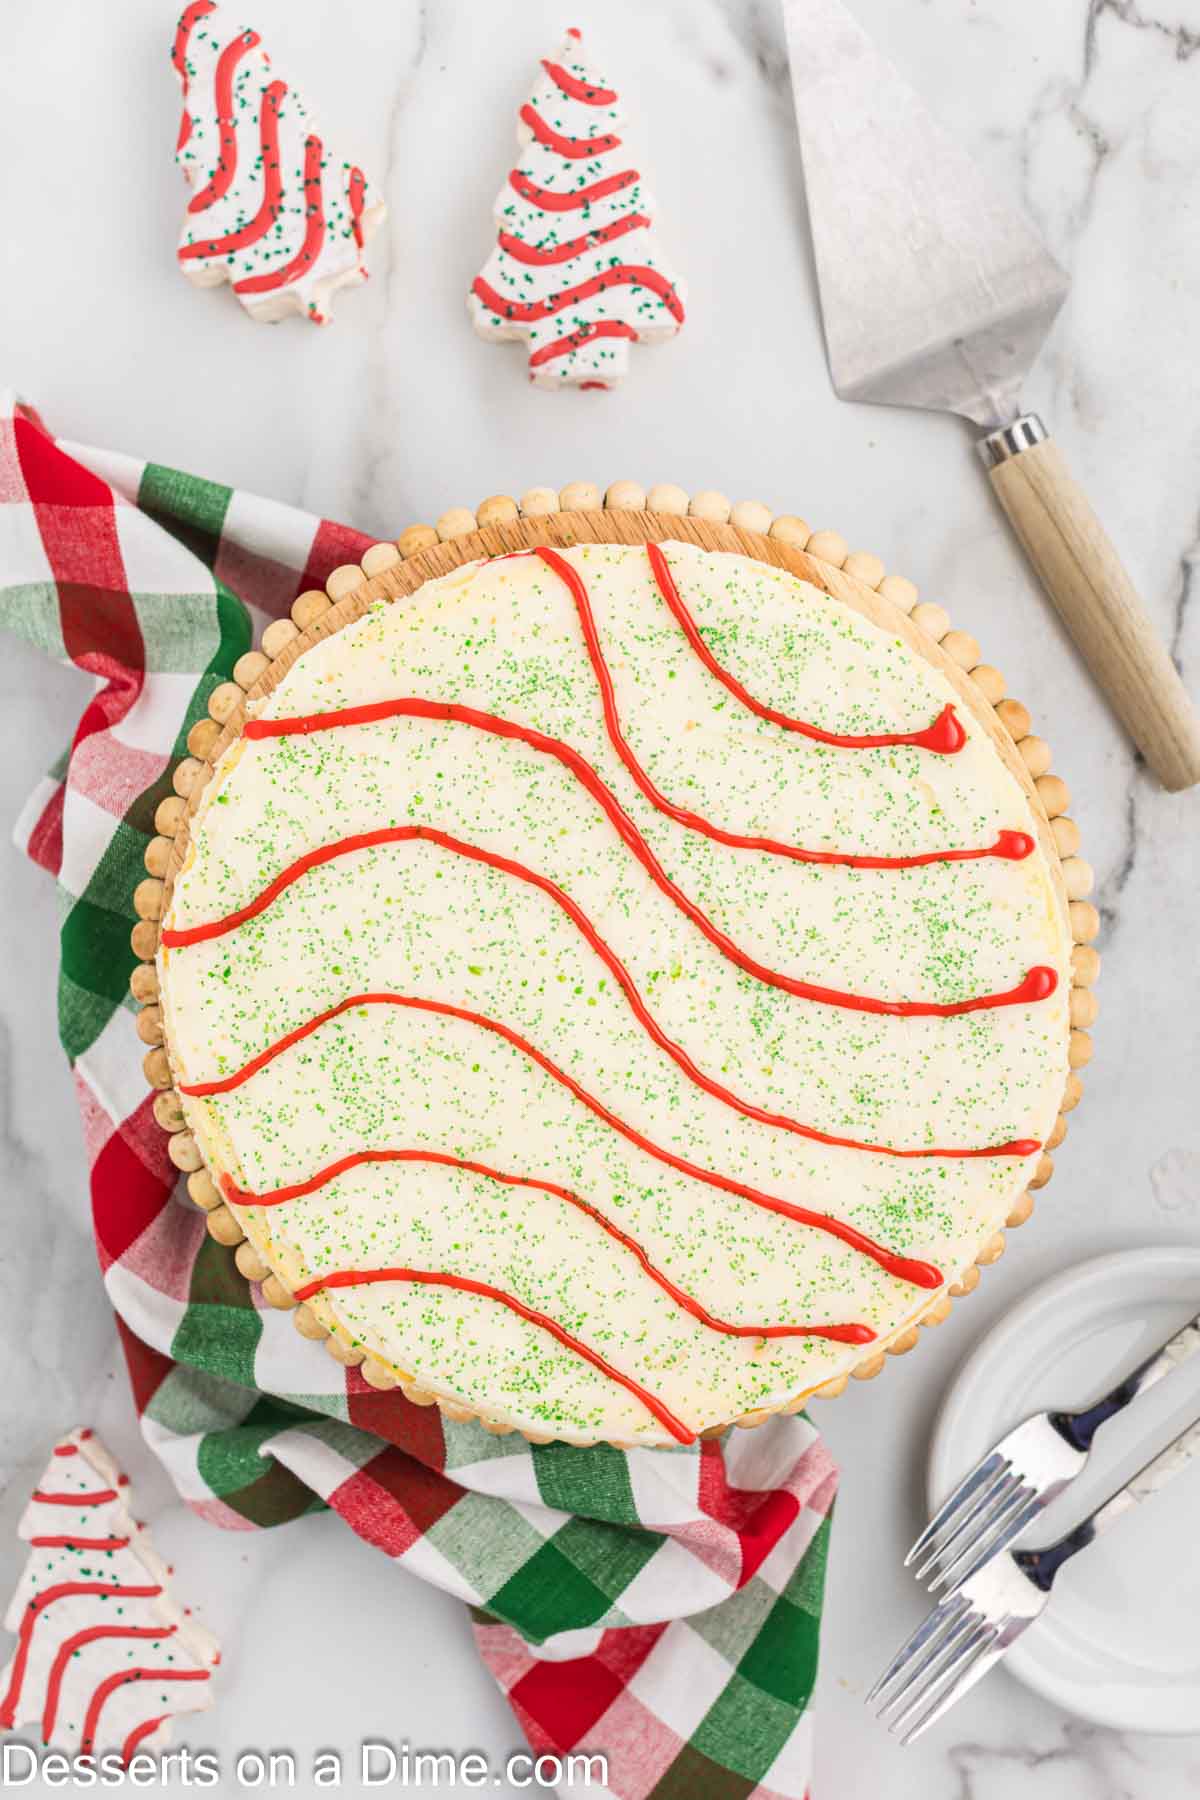
Step 14. Use the cookie icing to create lines over the cheesecake to look like a Little Debbie Christmas Tree cake. Carefully pipe the icing over the green sprinkles.

Step 15. The cheesecake is ready to slice and serve.
Storage
Refrigerate: Store the cheesecake in an airtight container or cover tightly with plastic wrap. It will keep in the refrigerator for 3–4 days.
Freeze: For longer storage, wrap the cheesecake tightly in plastic wrap and then in foil. Freeze for up to 1 month. Thaw in the refrigerator before serving.
Decorated Cheesecake: If the cheesecake is decorated with frosting or sprinkles, store in a single layer to prevent decorations from smudging.
Individual Servings: If making mini cheesecakes, store in an airtight container with layers separated by parchment paper.
Expert Tips
- Softened Cream Cheese: Make sure the cream cheese is fully softened at room temperature. This ensures the filling mixes easily and is silky smooth.
- Remove Air Bubbles: Gently tap the filled pan on the counter to release trapped air. This helps prevent cracks in the cheesecake during baking.
- Cool in the Oven: Allow the cheesecake to cool gradually in the turned-off oven before refrigerating. This prevents sudden temperature changes that can cause cracking and helps the cheesecake set perfectly.
- Room Temperature Ingredients: Use room-temperature eggs, cream cheese, and sour cream to achieve a smooth, creamy filling without lumps.
- Full-Fat Cream Cheese: Full-fat cream cheese provides the richest flavor and creamiest texture. Avoid light or reduced-fat versions, as they can affect taste and consistency.
- Avoid Overmixing: Mix the filling until just combined. Overmixing can incorporate too much air, which may lead to cracks or a less dense texture.
- Chill Before Decorating: Refrigerate the cheesecake until fully set before adding decorations, sprinkles, or frosting for the best presentation.
Frequently Asked Questions
Sometimes this happens but the ganache topping will cover it. Add the ganache as normal to the cheesecake and no one will see the crack.
The recipe calls for 7 but you can reduce to 5. However, I would not use any less or it won’t have the same flavor.
It needs a minimum of 4 hours, but I prefer overnight. Don’t try to slice it before it has properly chilled, or it won’t cut easily into slices.
More Christmas Desserts
- Christmas Dirt Cake Recipe
- Christmas Brownies
- Christmas Cake Pops
- Christmas Tree Cake Pops
- Christmas Jello Poke Cake
I’m so excited to hear what you think! Give this a try and leave a comment and star rating.
Little Debbie Christmas Tree Cheesecake
Ingredients
For the Crust:
- 1 1/2 cup Golden Oreos crushed
- 4 Tablespoons Butter melted
- 1 Tablespoon Christmas Nonpareils Sprinkles
For the Filling:
- 3 pkg cream cheese softened 8 ounces each
- ½ cup granulated sugar
- 3 tablespoons all purpose flour
- 1 teaspoon vanilla extract
- 1/4 cup heavy whipping cream
- 1/2 cup Full Fat Sour Cream
- 4 large eggs
- 7 Little Debbie Christmas Tree Cakes
For the Ganache Topping:
- 1 cup white baking chocolate
- 1/3 cup heavy whipping cream
- Green Sanding Sprinkles
- Red Store-Bought Cookie Frosting
See how we calculate recipe costs.
Instructions
For the Crust:
- Preheat the oven to 325 degrees Fahrenheit.
- Pulse the golden Oreos in a food processor until they are fine crumbs. Mix together the crust ingredients in a mixing bowl.
- Press this mixture into the bottom of a 9 inch springform pan and press the mixture up the sides of the pan approximately ½ inch.
- Bake for 8 minutes and then cool at room temperature.
For the Cheesecake:
- Beat the softened cream cheese with a hand held mixer or stand up mixer until soft and creamy.
- Mix in the granulated sugar, flour and vanilla extract for 1-2 minutes until combined. Scrape down the sides of the bowls as needed.
- Slowly add in the eggs, one at a time, until each egg is fully combined. Be careful not to over mix.
- Keep the mixer speed on low and mix in the sour cream and heavy cream until both are thoroughly combined.
- Pour half of the cream cheese mixture over the crust. Smooth it out as much as possible with a spatula.
- Place the Little Debbie Cakes on top of the cheesecake batter and gently press them down into the batter.
- Pour the remaining cheesecake batter on top and gently tap the cheesecake against the counter to get out any air bubbles.
- Place the pan into a large pan and pour boiling water around the cheesecake pan until it goes up approximately halfway up the side of the cheesecake pan.
- Bake for 55-65 minutes. The edges should be set and the center should still appear jiggly.
- Turn the oven off and crack the oven door. Let the cheesecake sit in the oven for 45 more minutes until the cheesecake has cooled to room temperature.
- Remove from the oven and carefully remove the cheesecake from the water.
- Chill in the refrigerator for at least 4 hours or overnight.
For the Ganache Topping:
- Place the heavy cream in a microwave safe bowl and heat in 30 second intervals until the cream is hot but not boiling.
- Pour the cream over the white chocolate and let sit for a few minutes and then stir until thoroughly combined and smooth.
- Remove the cheesecake carefully from the springform pan by running a knife around the sides of the cheesecake to release the cheesecake from the pan and move the cheesecake to a serving plate.
- Pour the white chocolate and cream mixture over the top of the cheesecake and smooth it out. Sprinkle the green sanding sprinkles on top.
- Cream lines over the cheesecake to look like a Little Debbie Christmas Tree cake with the premade red frosting.
- Then the cheesecake is ready to serve immediately or refrigerate, covered, for up to 3-5 days. Enjoy!

This is so amazing! I’m going to make this every Christmas!