Quick and easy Oreo Icebox Cake with layered Oreos and creamy filling. Perfect for no-bake desserts, celebrations, or summer treats.
Oreo Icebox Cake is a creamy, chocolatey no-bake dessert that layers Oreo cookies with whipped cream for an irresistible treat. Perfect for parties, holidays, or a simple sweet snack, this dessert comes together quickly without turning on the oven.
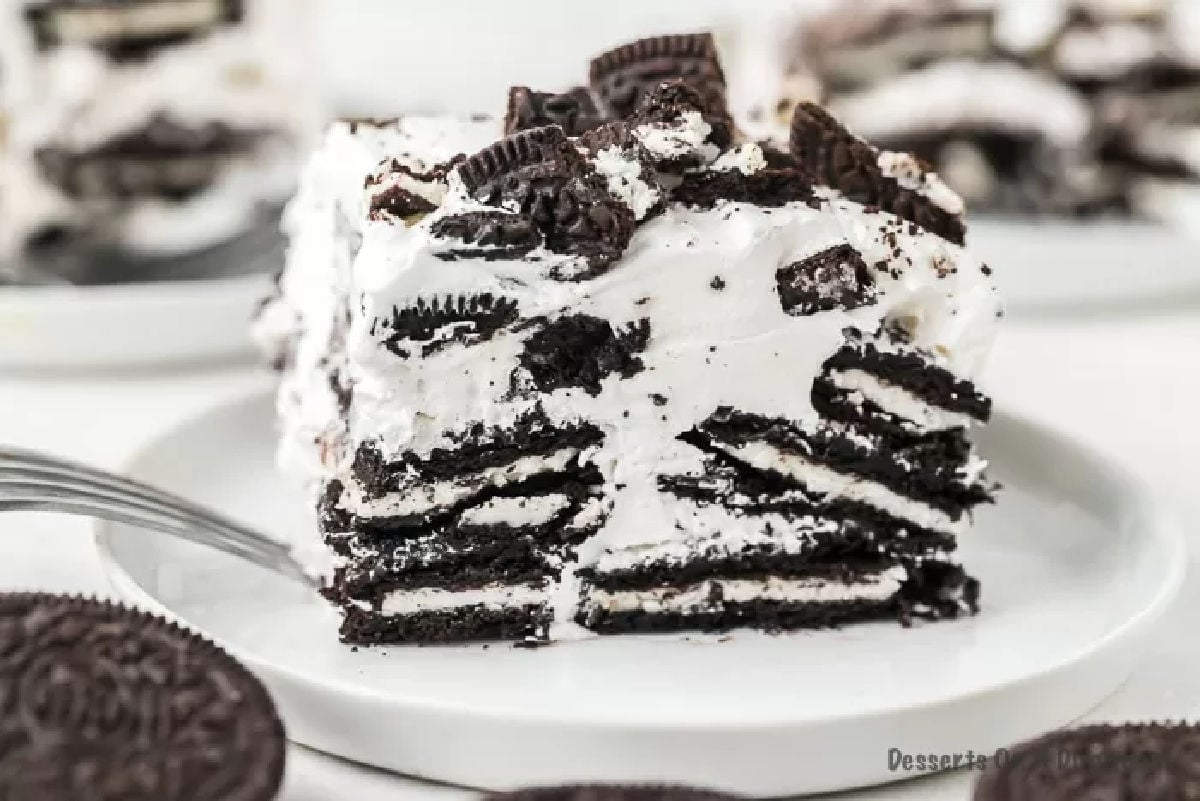
Chilled in the refrigerator, the cookies soften and meld with the creamy filling, creating a cake-like texture that’s loved by kids and adults alike. You might also like Peanut Butter Icebox Cake, Red White and Blue Icebox Cake, and Chocolate Icebox Cake.
Table of contents
Why We Love This Recipe
- No-Bake Convenience – Comes together quickly without needing an oven.
- Creamy & Chocolatey – Layers of Oreo cookies and whipped cream create a rich, indulgent dessert.
- Kid-Friendly – Loved by kids and adults alike for its sweet, chocolatey flavor.
- Perfect for Parties – A crowd-pleasing dessert for holidays, gatherings, or potlucks.
- Make-Ahead Friendly – Can be prepared in advance and chilled until ready to serve.
- Customizable – Add chocolate chips, caramel drizzle, or crushed candies for extra fun.
- Light & Soft Texture – Chilled cookies soften to a cake-like consistency while keeping the dessert light.
What Is An Icebox Cake?
An icebox cake is a no-bake dessert made by layering cookies or wafers with a creamy filling, usually whipped cream, pudding, or cream cheese. Once assembled, the cake is chilled in the refrigerator (or “icebox”) for several hours or overnight.
During this time, the cookies soften as they absorb moisture from the filling, creating a soft, cake-like texture. Icebox cakes are popular because they’re easy to make, require no baking, and can be customized with a variety of cookies, flavors, and toppings.
Ingredients

- Oreo Cookies – Regular Oreos work best; avoid Double Stuf or Oreo Thins for proper layering and texture.
- Cool Whip – Store-bought or Homemade Whipped Cream works perfectly for the creamy filling.
- Milk – Whole milk adds richness and helps soften the cookies for that classic icebox cake texture.
Find the complete list of ingredients at the bottom of the page.
Variations
- Chocolate Lovers – Add a layer of chocolate pudding or drizzle melted chocolate over the top. Also try chocolate chip cookies instead of Oreos.
- Peanut Butter Twist – Spread a thin layer of peanut butter between the Oreo layers for a chocolate-peanut butter combo.
- Oreo – Use mint-flavored Oreos for a refreshing chocolate-mint dessert or Golden Oreos for something different.
- Fruit Addition – Layer sliced strawberries, bananas, or raspberries between the cookies and cream for a fruity twist.
- Caramel Drizzle – Top with caramel sauce for extra sweetness and gooeyness.
- Mini Version – Make individual servings in cups or jars for parties or gifts.
- Nutty Crunch – Sprinkle chopped nuts, such as pecans or almonds, between layers for extra texture.
- Holiday Theme – Use colored sprinkles, crushed peppermint, or seasonal candies to match the occasion.
How To Make Oreo Icebox Cake

Step 1. Dip the cookies in milk.

Step 2. Then place them side by side in a 9X13 pan. Once arranged, top the layer of cookies with whipped topping. Make sure to spread it over all the cookies. I use a spatula to eaily do this.

Step 3. Keep making the layer of Oreos. Continue this process 2 more times to use all the cookies and cool whip.

Step 4. Finally, chop up the remaining Oreos. Sprinkle the crushed-up Oreos on top of the cake. Place in the fridge at least 4 hours but overnight is best Then serve.
Storage
Refrigerator – Store the assembled Oreo Icebox Cake in an airtight container or cover tightly with plastic wrap. It will keep for up to 4–5 days.
Do Not Freeze – Freezing is not recommended, as the cookies may become too soft and the texture can change in the freezer.
Make-Ahead Friendly – Prepare the cake a day or two in advance; chilling overnight allows the cookies to soften and the flavors to meld perfectly.
Keep Covered – Always keep the cake covered to prevent it from absorbing other refrigerator odors and to maintain its creamy texture.

Pro Tips
- Use Regular Oreos – Avoid Double Stuff or Oreo Thins; regular Oreos hold up better and give the perfect texture.
- Cool Whip or Whipped Cream – Either store-bought or homemade whipped cream works; make sure it’s fully whipped and fluffy.
- Layer Evenly – Spread the filling evenly between cookie layers to ensure consistent flavor and texture.
- Chill Overnight – Allow the cake to chill at least 4–6 hours, or overnight for best results; the cookies soften and create a cake-like texture.
- Gently Press Layers – Lightly press each cookie layer into the cream to help the cake hold its shape without crushing the cookies.
- Optional Mix-Ins – Add chocolate chips, sprinkles, or fruit between layers for extra flavor and texture.
- Serve Cold – Keep the cake refrigerated until serving to maintain the creamy, soft texture.
More Oreo Desserts
Love this Oreo Ice Box Cake? Give it a 5-star rating and leave a comment below! Share how it turned out, any mix-ins you tried, or your favorite way to serve it. Don’t forget to save or share this recipe so you can enjoy this creamy, chocolatey, no-bake dessert anytime, whether for parties, holidays, or a sweet treat at home.

Oreo Icebox Cake Recipe
Ingredients
- 95 Oreo Cookies
- 3 12 oz containers of Cool Whip, thawed at room temperature
- 1 1/2- 2 cups Milk
See how we calculate recipe costs.
Instructions
- Dip approximately 30 Oreo Cookes in milk and place them side by side in a 9X13 pan.
- Then spread 1 container of the cool whip over the top of these cookies.
- Continue this process 2 more times in the same pan to use all the cookies and cool whip.
- Chop up the remaining 5 Oreos. Sprinkle the crushed up Oreos on top of the cake.
- Refrigerate for a minimum of 4 hours but overnight is preferred.
- Slice and enjoy!

Thank you sooo much my kiddos and myself love your recipes son easy so convenient and oh sooo good ❤️💕❤️💕♥️
There is no such thing as a12oz container of cool whip It’s either 8 oz or 16 0z so which should I use?
I think the 16 ounces would work great – You can’t have too make cool whip!