Indulge in a festive Christmas Dessert Lasagna. Layers of creamy, sweet goodness with holiday flavors make it the perfect holiday treat.
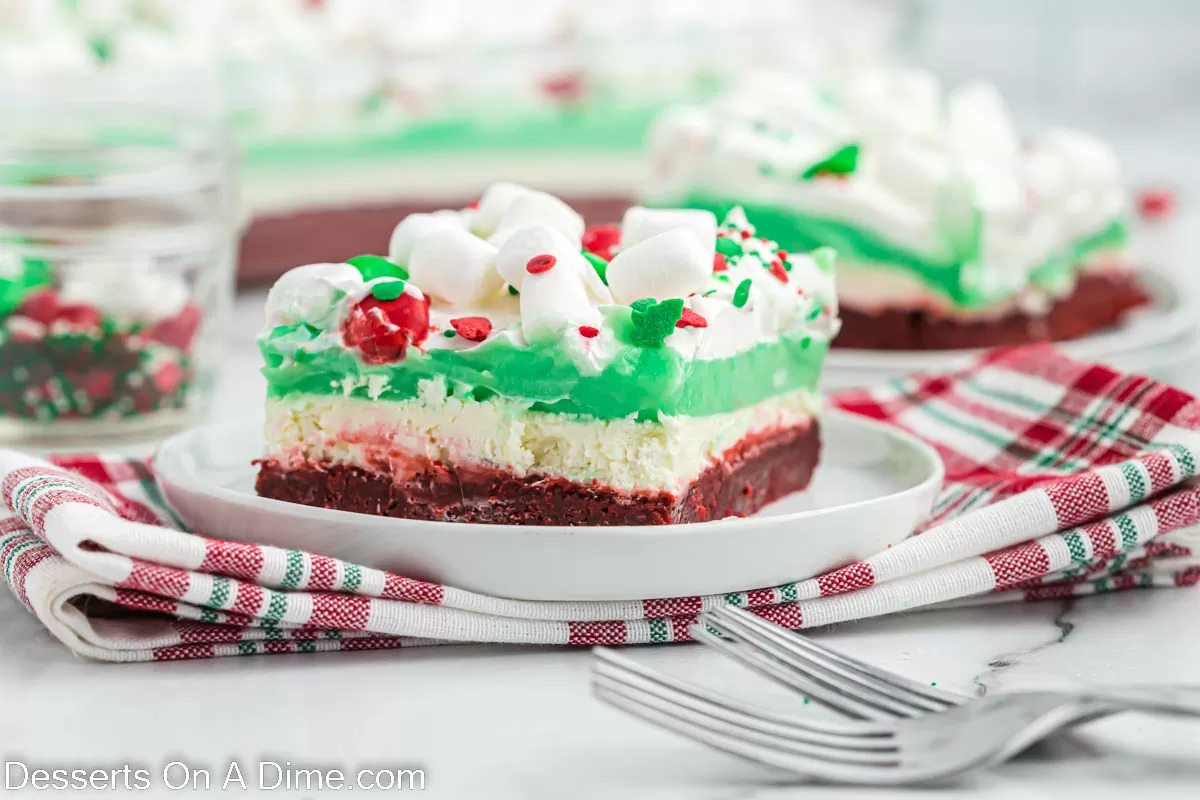
Treat yourself this holiday season with a decadent Christmas Dessert Lasagna! Layers of creamy cream cheese, chocolate, and fluffy whipped topping come together in a festive, crowd-pleasing dessert. It’s perfect for holiday parties, family gatherings, or sweetening up any celebration.
This no-bake dessert is not only delicious but also easy to make, even for busy holiday schedules. With layers of rich flavor and festive toppings, it’s a treat that looks as impressive as it tastes.
Dessert lasagnas are so fun to make. I have been making them for years. I also love to make Chocolate Lasagna Recipe and Peanut Butter Lasagna .
What's in this post: Christmas Dessert Lasagna
Why We Love This
- Festive Layers: Beautiful, colorful layers make it a show-stopping holiday dessert.
- No-Bake Convenience: Easy to assemble without turning on the oven. Perfect for busy schedules.
- Creamy and Decadent: Rich cream cheese, chocolate, and whipped topping create an indulgent treat.
- Perfect for Sharing: Ideal for holiday parties, potlucks, or family gatherings.
- Customizable: Add your favorite toppings like crushed candy canes, sprinkles, or chocolate shavings for a personal touch.
Ingredients

Crust
- Red Velvet Cake Mix: Use any brand you prefer for a rich, festive base.
- Butter: Unsalted and softened to room temperature for a tender, flavorful dessert.
- Egg: Large eggs help bind the ingredients and add moisture to the layers.
Peppermint Cheesecake Layer
- Cream Cheese: Full-fat, block-style cream cheese creates a rich and creamy layer.
- Peppermint Extract: Adds a festive, refreshing peppermint flavor to the dessert.
- Cool Whip: Convenient and fluffy; can be substituted with Homemade Whipped Cream for a fresh touch.
Green Pudding Layer
- White Chocolate Pudding: Use instant pudding for a quick, creamy layer.
- Green Gel Food Coloring: Gel food coloring gives bright, vibrant holiday colors without thinning the pudding.
Topping
- Mini Marshmallows: The small size works perfectly for layering and adds a soft, sweet texture.
- Christmas Sprinkles: Use your favorite type to add color and festive flair.
- Red and Green M&M’s: Adds a fun, colorful, and festive touch to the dessert.
Scroll to the bottom and find the complete ingredient list in the recipe card.
Substitutions and Additions
- Toppings: Get creative! Try white chocolate chips, crushed candy canes, festive sprinkles, or chocolate shavings for extra flavor and decoration.
- Candy Cane Twist: Swap the green food coloring for red to create a red-and-white candy cane-inspired dessert layer.
- Keep It Simple: You can omit the food coloring entirely. Your dessert will still look beautiful and taste amazing.
- Boost the Red Velvet Layer: Add a few drops of red food coloring to the cake layer to make the red extra vibrant.
- Mix & Match Flavors: Try different pudding flavors like chocolate or peppermint for a fun twist on the classic layers.
Step By Step Instructions
Step 1 – Preheat the oven to 350. Set the oven to 350 degrees F and grease bottom of the pan with non-stick cooking spray.

Step 2. Combine the cake mix, butter and eggs in a large mixing bowl. Pour the mixture into the baking dish and bake for 15-18 minutes. Then let it cool completely.

Step 3. Make the Peppermint Cheesecake Layer. Beat the cream cheese and softened butter with peppermint extract and powdered sugar. Combine until creamy and smooth. Fold in the cool whip to the cream cheese mixture. Then spread over the crust and set in the fridge or freezer to firm.

Step 4. In a bowl, whisk instant white chocolate pudding mix and milk until it starts thickening. Add the green food coloring (a few drops at a time) until the pudding is the color that you prefer.

Step 5. Spread the green layer over the cream cheese layer. Place in the fridge or freezer to set.

Step 6. When the pudding layer has set, spread Cool Whip on top of the pudding layer. Then place in the refrigerator for a few hours or overnight.

Step 7. Before serving, sprinkle 2 cups of mini marshmallows over the top. Then top with the Christmas sprinkles and M&Ms.
Pro Tips
- Skip the Box Instructions: Do not follow the cake mix box directions. Use only the ingredients listed in this recipe for the perfect texture and flavor.
- Let Layers Set: Allow each layer to cool or firm up before adding the next. This ensures clean, distinct layers and prevents them from blending together.
- Add Toppings Last: Only decorate with candy, sprinkles, or chocolate just before serving. This prevents them from melting or bleeding into the whipped cream, keeping your dessert looking festive.
- Use a Clear Dish: For a beautiful presentation, assemble the dessert in a clear glass dish so the colorful layers are visible.
- Chill Before Serving: Refrigerate the dessert for a few hours to help the layers set fully and enhance the flavors.
- Cut Carefully: Use a sharp knife and wipe between slices to keep clean, neat layers when serving.
Frequently Asked Questions
Cover the dessert tightly with plastic wrap or a lid. Refrigerate up to 4 days.
Yes, this dessert is freezer friendly. Once prepared, cover in plastic wrap.
I would use several layers and then a final in aluminum foil. It can be frozen up to 1 month.
Allow to thaw before cutting and serving. I normally let it sit at room temperature for 30 minutes before slicing.
This dessert is easy to make in advance. I often make up to 3 days in advance to have it ready for a Christmas party.
It is actually better the next day when it firms completely overnight in the fridge. Feel free to make this 2-3 days ahead.
I love to make it in advance because it also cuts down on prep work. It helps to free up oven space when you have other things to do.
Use a sharp knife to cut this dessert into squares. Wipe any excess on the knife with a napkin so you will have clean lines.
This will ensure nice clean cuts and a gorgeous presentation when serving. The layers are so pretty.

More Christmas Desserts
- Christmas Tree Cupcake Cake
- Christmas Dump Cake Recipe
- Christmas Bundt Cake
- Christmas Jello Poke Cake Recipe
- Crock Pot Christmas Candy Recipe
- Christmas Oreo Balls Recipe
Everyone will enjoy this Christmas Lasagna Dessert Recipe so make it for the holiday season! Once you do, please leave a comment and star recipe rating.

Christmas Dessert Lasagna
Ingredients
For the Crust:
- 1 box Red Velvet Cake Mix
- ½ cup unsalted butter-melted
- 1 Large Egg
Peppermint Cheesecake Layer:
- ½ cup unsalted butter-softened
- 8 oz. cream cheese-softened
- 1/2 powdered sugar
- 1 teaspoon peppermint extract
- 1 1/4 cups cool whip
Green Pudding Layer:
- 2 3.8 oz. White chocolate instant pudding mix
- 2 ¾ cups milk
- Green Food Coloring
Topping:
- 1 ½ cups whipped cream
- 2 cups mini marshmallows
- Christmas Sprinkles
- Red and Green M&Ms
See how we calculate recipe costs.
Instructions
- Preheat the oven to 350 degrees F and grease a 9X12 baking pan with non-stick cooking spray.
- In a large mixing bowl, stir together the red velvet cake mix, butter and egg. Spread this mixture evenly into the prepared pan and bake for 15-18 minutes. Then let it cool completely at room temperature.
- To make peppermint cheesecake layer, beat softened butter and cream cheese with peppermint extract and powdered sugar until creamy and smooth.
- Fold in the cool whip. Then, spread over the crust and set in the fridge or freezer to firm.
- For the pudding layer in a bowl whisk instant white chocolate pudding mix and milk until it starts thickening. Add the green food coloring (a few drops at a time) until the pudding is the color that you prefer. Spread over the cheesecake layer. Place in the fridge or freezer to set.
- When the pudding layer has set, spread Cool Whip on top of the pudding layer and place in the fridge for a few hours (or overnight).
- Before serving, sprinkle 2 cups of mini marshmallows over the top. Then top with the Christmas sprinkles and M&Ms.
- Serve cold and enjoy!
